#!/usr/bin/env python3
# -*- coding: utf-8 -*-
"""
Created on Wed May 16 10:50:29 2018
@author: dag
"""
import sympy
import numpy as np
import math
from matplotlib.pyplot import plot
from matplotlib.pyplot import show
import matplotlib.pyplot as plt
import matplotlib
#解决无法显示中文问题,fname是加载字体路径,根据自身pc实际确定,具体请百度
zhfont1 = matplotlib.font_manager.FontProperties(fname='/System/Library/Fonts/Hiragino Sans GB W3.ttc')
#随机产生3个参考节点坐标
maxy = 1000
maxx = 1000
cx = maxx*np.random.rand(3)
cy = maxy*np.random.rand(3)
dot1 = plot(cx,cy,'k^')
#生成盲节点,以及其与参考节点欧式距离
mtx = maxx*np.random.rand()
mty = maxy*np.random.rand()
plt.hold('on')
dot2 = plot(mtx,mty,'go')
da = math.sqrt(np.square(mtx-cx[0])+np.square(mty-cy[0]))
db = math.sqrt(np.square(mtx-cx[1])+np.square(mty-cy[1]))
dc = math.sqrt(np.square(mtx-cx[2])+np.square(mty-cy[2]))
#计算定位坐标
def triposition(xa,ya,da,xb,yb,db,xc,yc,dc):
x,y = sympy.symbols('x y')
f1 = 2*x*(xa-xc)+np.square(xc)-np.square(xa)+2*y*(ya-yc)+np.square(yc)-np.square(ya)-(np.square(dc)-np.square(da))
f2 = 2*x*(xb-xc)+np.square(xc)-np.square(xb)+2*y*(yb-yc)+np.square(yc)-np.square(yb)-(np.square(dc)-np.square(db))
result = sympy.solve([f1,f2],[x,y])
locx,locy = result[x],result[y]
return [locx,locy]
#解算得到定位节点坐标
[locx,locy] = triposition(cx[0],cy[0],da,cx[1],cy[1],db,cx[2],cy[2],dc)
plt.hold('on')
dot3 = plot(locx,locy,'r*')
#显示脚注
x = [[locx,cx[0]],[locx,cx[1]],[locx,cx[2]]]
y = [[locy,cy[0]],[locy,cy[1]],[locy,cy[2]]]
for i in range(len(x)):
plt.plot(x[i],y[i],linestyle = '--',color ='g' )
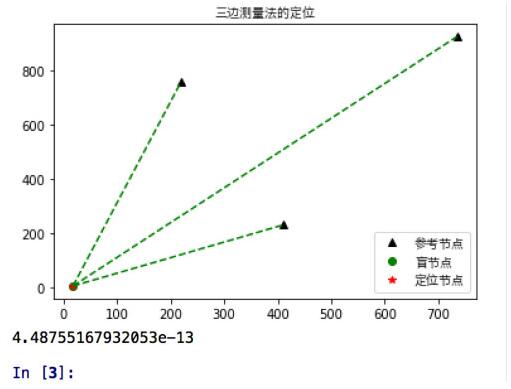
plt.title('三边测量法的定位',fontproperties=zhfont1)
plt.legend(['参考节点','盲节点','定位节点'], loc='lower right',prop=zhfont1)
show()
derror = math.sqrt(np.square(locx-mtx) + np.square(locy-mty))
print(derror)
import cv2
import numpy as np
import scipy.io as scio
if __name__ == '__main__':
    print("main function.")
    #验证点
    point = np.array([1.0 ,2.0, 3.0])
    #获取相机参数
    cams_data = scio.loadmat('/data1/dy/SuperSMPL/data/AMAfMvS_Dataset/cameras_I_crane.mat')
    Pmats = cams_data['Pmats']  # Pmats(8, 3, 4) 投影矩阵
    P1 = Pmats[0,::]
    P3 = Pmats[2,::]
    #通过投影矩阵将点从世界坐标投到像素坐标
    pj1 = np.dot(P1, np.vstack([point.reshape(3,1),np.array([1])]))
    pj3 = np.dot(P3, np.vstack([point.reshape(3,1),np.array([1])]))
    point1 = pj1[:2,:]/pj1[2,:]#两行一列,齐次坐标转化
    point3 = pj3[:2,:]/pj3[2,:]
    #利用投影矩阵以及对应像素点,进行三角测量
    points = cv2.triangulatePoints(P1,P3,point1,point3)
    #齐次坐标转化并输出
    print(points[0:3,:]/points[3,:])