POST TIME:2021-08-22 21:18
通过实现 UniMRCP 的 plugin,我们可以封装讯飞、百度、阿里等厂家的 ASR 接口,实现我们自己的 MRCP 服务器。
媒体资源控制协议(Media Resource Control Protocol, MRCP)是一种通讯协议,用于媒体资源服务器向客户端提供各种语音服务,目前已定义的媒体资源服务有语音识别(Speech Recognition)、语音合成(Speech Synthesis)、录音(Recording)、说话人鉴别和确认(Speaker Verification and Identifi-cation)。MRCP并不定义会话连接,不关心服务器与客户端是如何连接的,MRCP消息使用RTSP、SIP等作为控制协议,目前最新的MRCPv2版本使用SIP控制协议。(本文使用的是MRCPv2)。
本文所有操作均在 CentOS 7 下进行。
UniMRCP is an open source cross-platform implementation of the MRCP client and server in the C/C++ language distributed under the terms of the Apache License 2.0. The implementation encapsulates SIP, RTSP, SDP, MRCPv2, RTP/RTCP stacks and provides integrators with an MRCP version consistent API.
首先去官网下载“UniMRCP 1.5.0”和“UniMRCP Deps 1.5.0”。
切换到 root 账户,首先进入 Deps 目录进行依赖安装:
1 |
./build-dep-libs.sh |
UniMRCP 安装可参考官网:
1 2 3 4 5 6 7 8 9 10 11 12 13 14 15 16 17 18 19 |
./bootstrap The usual "configure", "make", "make install" sequence of commands should follow in order to build and install the project from source. ./configure make make install As a result, the project will be installed in the directory "/usr/local/unimrcp" with the following layout: bin binaries (unimrcpserver, unimrcpclient, ...) conf configuration files (unimrcpserver.xml, unimrcpclient.xml, ...) data data files include header files lib shared (convenience) libraries log log files plugin run-time loadable modules |
安装完成后,可进入/usr/local/unimrcp/bin目录下,运行 server:
1 |
./unimrcpserver -o 3 |
启动成功后会提示“MRCP Server Started”。我们可以使用提供的 Client 进行验证:
1 2 3 4 5 6 7 8 9 10 11 12 13 14 15 16 17 |
./unimrcpclient

.
.
.
>help
usage:

- run [app_name] [profile_name] (run demo application)
       app_name is one of 'synth', 'recog', 'bypass', 'discover'
       profile_name is one of 'uni2', 'uni1', ...

       examples:
           run synth
           run recog
           run synth uni1
           run recog uni1
|
如上图所示,启动完 Client 后,可输入run synth等命令,可以观察 Server 和 Client 端的日志,synth 是语音合成,recog 是语音解析。
直接从源代码切入其实是比较费劲的,我们可以结合服务器端的日志打印,从源代码中找出相应的调用过程。调用过程较复杂,后面只列出较为关键的部分。
首先看日志,这里我们筛选了 Demo Recog 的日志,其他 plugin 道理上是一样的:
1 2 3 4 |
[INFO] Load Plugin [Demo-Recog-1] [/usr/local/unimrcp/plugin/demorecog.so] [INFO] Register MRCP Engine [Demo-Recog-1] [INFO] Open Engine [Recorder-1] [INFO] Start Task [Demo Recog Engine] |
通过上面的信息我们可以去搜索源代码,查看一个 plugin 的加载流程。
下面是从配置文件解析到 plugin 到 .so 被加载的流程:
1 2 3 4 5 6 7 |
unimrcp_server.c
/** Load plugin */
static apt_bool_t unimrcp_server_plugin_load(unimrcp_server_loader_t *loader, const apr_xml_elem *root) {
...
	engine = mrcp_server_engine_load(loader->server,plugin_id,plugin_path,config);
...
}
|
1 2 3 4 5 6 7 8 9 10 11 |
mrcp_server.c
/** Load MRCP engine */
MRCP_DECLARE(mrcp_engine_t*) mrcp_server_engine_load(
								mrcp_server_t *server,
								const char *id,
								const char *path,
								mrcp_engine_config_t *config) {
...
	engine = mrcp_engine_loader_plugin_load(server->engine_loader,id,path,config);
...
}
|
1 2 3 4 5 6 7 |
mrcp_engine_loader.h
/** Load engine plugin */
MRCP_DECLARE(mrcp_engine_t*) mrcp_engine_loader_plugin_load(mrcp_engine_loader_t *loader, const char *id, const char *path, mrcp_engine_config_t *config) {
...
apr_dso_load(&plugin,path,loader->pool)
...
}
|
load 成功之后,注册了该 engine:
1 2 3 4 5 6 7 |
unimrcp_server.c
/** Load plugin */
static apt_bool_t unimrcp_server_plugin_load(unimrcp_server_loader_t *loader, const apr_xml_elem *root) {
...
	return mrcp_server_engine_register(loader->server,engine);
...
}
|
最终会加到 hash 表中:
1 2 3 4 5 6 7 8 |
mrcp_engine_factory.c
/** Register new engine */
MRCP_DECLARE(apt_bool_t) mrcp_engine_factory_engine_register(mrcp_engine_factory_t *factory, mrcp_engine_t *engine)
{
...
	apr_hash_set(factory->engines,engine->id,APR_HASH_KEY_STRING,engine);
...
}
|
上面是 unimrcp_server_load调用后的一系列加载,成功之后将会启动服务器:
1 2 3 4 5 6 7 8 9 10 |
unimrcp_server.c
/** Start UniMRCP server */
MRCP_DECLARE(mrcp_server_t*) unimrcp_server_start(apt_dir_layout_t *dir_layout)
{
...
unimrcp_server_load(server,dir_layout,pool)
...
mrcp_server_start(server)
...
}
|
1 2 3 4 5 6 7 |
apt_bool_t mrcp_engine_virtual_open(mrcp_engine_t *engine) {
...
mrcp_engine_iface.c
/** Open engine */
engine->method_vtable->open(engine)
...
}
|
method_vtable 就涉及到 plugin 具体是如何被调用的了。
通过查看具体的调用流程,在对比官网 plugin 实现手册,就很容易理解手册里需要我们实现的接口具体是什么作用。
具体调用细节这里就不详细展开了,最终对 plugin 的所有操作,都是通过下面三个虚表中的函数指针来进行回调触发。
首先是 engine 层面的回调,其实对应的就是 plugin 的创建、打开、关闭、删除:
1 2 3 4 5 6 7 8 9 10 11 |
/** Table of MRCP engine virtual methods */
struct mrcp_engine_method_vtable_t {
       /** Virtual destroy */
       apt_bool_t (*destroy)(mrcp_engine_t *engine);
       /** Virtual open */
       apt_bool_t (*open)(mrcp_engine_t *engine);
       /** Virtual close */
       apt_bool_t (*close)(mrcp_engine_t *engine);
       /** Virtual channel create */
       mrcp_engine_channel_t* (*create_channel)(mrcp_engine_t *engine, apr_pool_t *pool);
};
|
客户端与服务器 plugin 通信时,在一个 session 内会创建 channel,并在会话终止时销毁该 channel。以下就是 channel 相关的回调:
1 2 3 4 5 6 7 8 9 10 11 |
/** Table of channel virtual methods */
struct mrcp_engine_channel_method_vtable_t {
       /** Virtual destroy */
       apt_bool_t (*destroy)(mrcp_engine_channel_t *channel);
       /** Virtual open */
       apt_bool_t (*open)(mrcp_engine_channel_t *channel);
       /** Virtual close */
       apt_bool_t (*close)(mrcp_engine_channel_t *channel);
       /** Virtual process_request */
       apt_bool_t (*process_request)(mrcp_engine_channel_t *channel, mrcp_message_t *request);
};
|
当使用 ASR 时需要有音频数据的流入,TTS 时需要有音频数据的流出,下面的回调就是为了处理音频数据:
1 2 3 4 5 6 7 8 9 10 11 12 13 14 15 16 17 18 19 |
/** Table of audio stream virtual methods */
struct mpf_audio_stream_vtable_t {
       /** Virtual destroy method */
       apt_bool_t (*destroy)(mpf_audio_stream_t *stream);
       /** Virtual open receiver method */
       apt_bool_t (*open_rx)(mpf_audio_stream_t *stream, mpf_codec_t *codec);
       /** Virtual close receiver method */
       apt_bool_t (*close_rx)(mpf_audio_stream_t *stream);
       /** Virtual read frame method */
       apt_bool_t (*read_frame)(mpf_audio_stream_t *stream, mpf_frame_t *frame);
       /** Virtual open transmitter method */
       apt_bool_t (*open_tx)(mpf_audio_stream_t *stream, mpf_codec_t *codec);
       /** Virtual close transmitter method */
       apt_bool_t (*close_tx)(mpf_audio_stream_t *stream);
       /** Virtual write frame method */
       apt_bool_t (*write_frame)(mpf_audio_stream_t *stream, const mpf_frame_t *frame);
       /** Virtual trace method */
       void (*trace)(mpf_audio_stream_t *stream, mpf_stream_direction_e direction, apt_text_stream_t *output);
};
|
通过对上面三个虚表内回调方法的实现,就可以对客户端发送过来的相应请求进行处理。
修改 configure.ac
因为 unimrcp 使用 automake 进行源码编译管理,所以除了添加源代码,我们还需要进行相应配置添加。
首先编辑 configure.ac 文件,添加如下,其实是一个宏定义会在后面的 Makefile 中使用到,以及添加后面我们新增的 Makefile:
1 2 3 4 5 6 7 8 9 10 11 12 |
dnl XFyun recognizer plugin.
UNI_PLUGIN_ENABLED(xfyunrecog)

AM_CONDITIONAL([XFYUNRECOG_PLUGIN],[test "${enable_xfyunrecog_plugin}" = "yes"])

...

plugins/xfyun-recog/Makefile

...

echo XFyun recognizer plugin....... : $enable_xfyunrecog_plugin
|
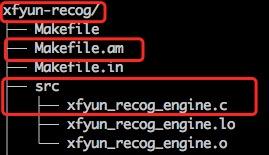
新增源代码及目录
在 plugin 目录下,新建 xfyun-recog 目录,并在该目录下新建 src 目录,可以将 demo_recog_engine.c 拷贝到该目录下改名为 xfyun_recog_engine.c,并将源代码中的所有“demo”替换为“xfyun”,当然也可以自己从 0 开始敲一遍。
新建 Makefile.am 文件,内容如下:
1 2 3 4 5 6 7 8 |
AM_CPPFLAGS = $(UNIMRCP_PLUGIN_INCLUDES) plugin_LTLIBRARIES = xfyunrecog.la xfyunrecog_la_SOURCES = src/xfyun_recog_engine.c xfyunrecog_la_LDFLAGS = $(UNIMRCP_PLUGIN_OPTS) include $(top_srcdir)/build/rules/uniplugin.am |
修改 plugin 目录下的 Makefile.am 文件,新增如下内容:
1 2 3 |
if XFYUNRECOG_PLUGIN SUBDIRS += xfyun-recog endif |
XFYUNRECOG_PLUGIN 就是 configure.ac 里面我们添加的内容。
最终目录结构如下图(请忽略红框外的文件):
完成后我们可以从第一步开始重新把 UniMRCP 编译一遍,应该可以看到 xfyun_recog_engine.so 的生成。
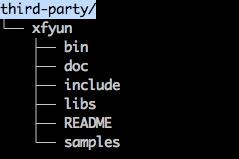
首先去讯飞开放平台下载语言听写及在线语音合成(后面 TTS 实现时用到)的SDK。
在 plugin 目录下新建 third-party 目录,将讯飞的 SDK 拷贝进去:
修改 xfyun_recog_engine 的 Makefile.am,添加对讯飞库的链接及安装时的拷贝:
1 2 3 4 5 6 7 8 9 10 11 12 |
plugin_LTLIBRARIES         = xfyunrecog.la

xfyunrecog_la_SOURCES       = src/xfyun_recog_engine.c
xfyunrecog_la_LDFLAGS       = $(UNIMRCP_PLUGIN_OPTS) \
                              -L$(top_srcdir)/plugins/third-party/xfyun/libs/x64 \
                              -lmsc -ldl -lpthread -lrt
xfyunrecog_ladir            = $(libdir)
xfyunrecog_la_DATA          = $(top_srcdir)/plugins/third-party/xfyun/libs/x64/libmsc.so

include $(top_srcdir)/build/rules/uniplugin.am

UNIMRCP_PLUGIN_INCLUDES     += -I$(top_srcdir)/plugins/third-party/xfyun/include
|
讯飞的实现可以参考官方文档和 SDK 里面提供的 asr_sample。
引用头文件
1 2 3 4 |
#include <stdlib.h> #include "qisr.h" #include "msp_cmn.h" #include "msp_errors.h" |
channel 新增变量
1 2 3 4 5 6 |
struct xfyun_recog_channel_t {
	...
	const char				*session_id;	//讯飞session_id
	const char				*last_result;	//存放识别结果
	apt_bool_t				recog_started;	//是否已开始识别
};
|
讯飞 login
1 2 3 4 5 6 7 8 9 10 11 12 13 14 15 |
static apt_bool_t xfyun_login()
{
	int			ret						=	MSP_SUCCESS;
	const char* login_params			=	"appid = 5ac1c462, work_dir = ."; // 登录参数,appid与msc库绑定,请勿随意改动

	/* 用户登录 */
	ret = MSPLogin(NULL, NULL, login_params); //第一个参数是用户名,第二个参数是密码,均传NULL即可,第三个参数是登录参数
	if (MSP_SUCCESS != ret)
	{
		apt_log(RECOG_LOG_MARK,APT_PRIO_ERROR,"[xfyun] MSPLogin failed , Error code %d.", ret);
		return FALSE; //登录失败,退出登录
	}
	apt_log(RECOG_LOG_MARK,APT_PRIO_INFO,"[xfyun] MSPLogin success");
	return TRUE;
}
|
我们在创建 engine 的时候调用该函数即可。
讯飞 session 创建、终止
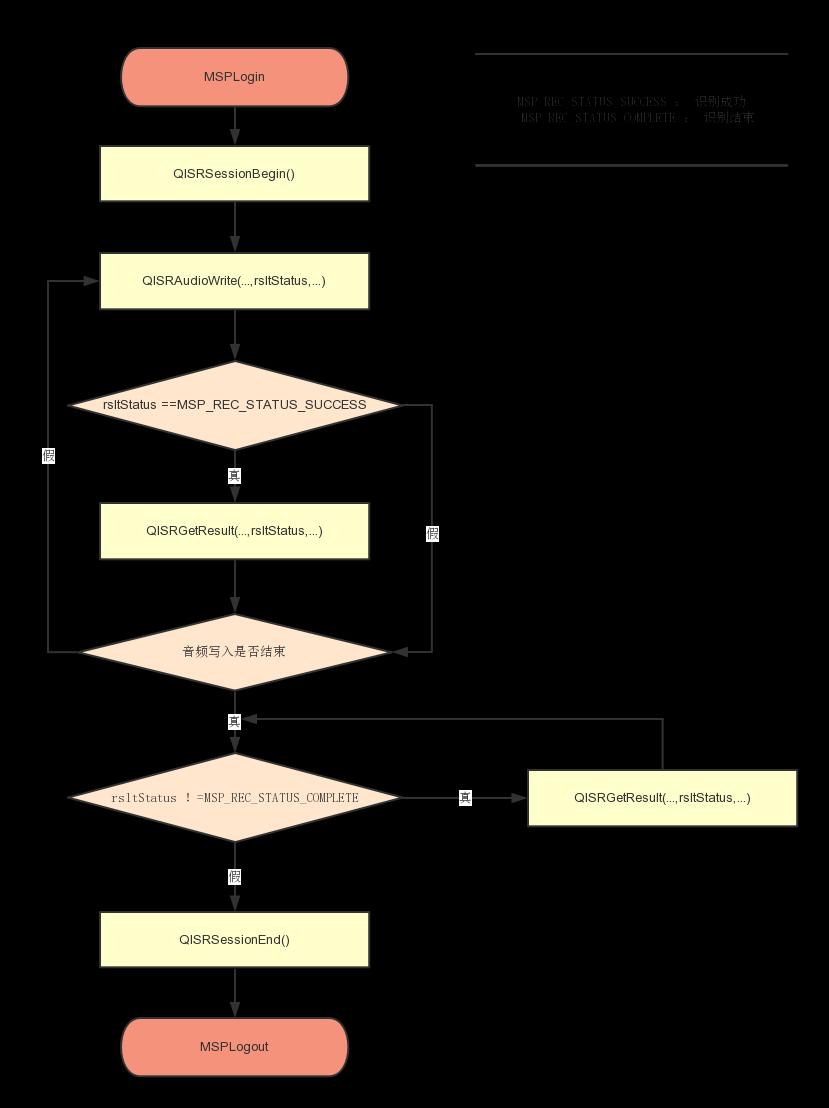
首先我们需要找到 session 创建、终止的时机。xfyun_recog_msg_process是处理 channel 中的 request 的回调,RECOGNIZER_RECOGNIZE 正是请求识别,所以我们在请求时创建 session,识别结束或者 RECOGNIZER_STOP 时终止该 session。
1 2 3 4 5 6 7 8 9 10 11 12 13 14 15 16 17 18 19 20 21 22 23 24 25 26 27 28 |
/** Process RECOGNIZE request */
static apt_bool_t xfyun_recog_channel_recognize(mrcp_engine_channel_t *channel, mrcp_message_t *request, mrcp_message_t *response)
{
...
/* reset */
	int errcode = MSP_SUCCESS;
	const char*	session_begin_params = "sub = iat, domain = iat, language = zh_cn, accent = mandarin, sample_rate = 8000, result_type = plain, result_encoding = utf8";
	recog_channel->session_id = QISRSessionBegin(NULL, session_begin_params, &errcode); //听写不需要语法,第一个参数为NULL
	if (MSP_SUCCESS != errcode)
	{
		apt_log(RECOG_LOG_MARK,APT_PRIO_WARNING,"[xfyun] QISRSessionBegin failed! error code:%d\n", errcode);
		return FALSE;
	}
	apt_log(RECOG_LOG_MARK,APT_PRIO_INFO,"[xfyun] QISRSessionBegin suceess!");

	recog_channel->last_result = NULL;
	recog_channel->recog_started = FALSE;

	recog_channel->recog_request = request;
}

void xfyun_recog_end_session(xfyun_recog_channel_t *recog_channel){
	if(recog_channel->session_id) {
		apt_log(RECOG_LOG_MARK,APT_PRIO_INFO,"[xfyun] QISRSessionEnd suceess!");
		QISRSessionEnd(recog_channel->session_id, "mrcp channel closed");
		recog_channel->session_id = NULL;
	}
}
|
处理语音流
xfyun_recog_stream_write是收到语音流的回调,很显然具体的识别处理应该在这个里面进行调用,下面是具体的识别函数:
1 2 3 4 5 6 7 8 9 10 11 12 13 14 15 16 17 18 19 20 21 22 23 24 25 26 27 28 29 30 31 32 33 34 35 36 37 38 39 40 41 42 43 44 45 46 47 48 49 50 51 52 53 54 55 56 57 |
static apt_bool_t xfyun_recog_stream_recog(xfyun_recog_channel_t *recog_channel,
							   const void *voice_data,
							   unsigned int voice_len
							   ) {
	// int MSPAPI QISRAudioWrite(const char* sessionID, const void* waveData, unsigned int waveLen, int audioStatus, int *epStatus, int *recogStatus);
	int aud_stat = MSP_AUDIO_SAMPLE_CONTINUE;		//音频状态
	int ep_stat	= MSP_EP_LOOKING_FOR_SPEECH;		//端点检测
	int rec_stat = MSP_REC_STATUS_SUCCESS;			//识别状态
	int ret = 0;
	if(FALSE == recog_channel->recog_started) {
		apt_log(RECOG_LOG_MARK,APT_PRIO_INFO,"[xfyun] start recog");
		recog_channel->recog_started = TRUE;
		aud_stat = MSP_AUDIO_SAMPLE_FIRST;
	} else if(0 == voice_len) {
		apt_log(RECOG_LOG_MARK,APT_PRIO_INFO,"[xfyun] finish recog");
		aud_stat = MSP_AUDIO_SAMPLE_LAST;
	}
	if(NULL == recog_channel->session_id) {
		return FALSE;
	}
	ret = QISRAudioWrite(recog_channel->session_id, voice_data, voice_len, aud_stat, &ep_stat, &rec_stat);
	if (MSP_SUCCESS != ret)
	{
		apt_log(RECOG_LOG_MARK,APT_PRIO_WARNING,"[xfyun] QISRAudioWrite failed! error code:%d", ret);
		return FALSE;
	}
	if(MSP_REC_STATUS_SUCCESS != rec_stat && MSP_AUDIO_SAMPLE_LAST != aud_stat) {
		// apt_log(RECOG_LOG_MARK,APT_PRIO_INFO,"[xfyun] no need recog,rec_stat=%d,aud_stat=%d",rec_stat,aud_stat);
		return TRUE;
	}
	while (1)
	{
		const char *rslt = QISRGetResult(recog_channel->session_id, &rec_stat, 0, &ret);
		if (MSP_SUCCESS != ret)
		{
			apt_log(RECOG_LOG_MARK,APT_PRIO_WARNING,"[xfyun] QISRGetResult failed, error code: %d", ret);
			return FALSE;
		}
		if (NULL != rslt)
		{
			if(NULL == recog_channel->last_result) {
				recog_channel->last_result = apr_pstrdup(recog_channel->channel->pool,rslt);
			} else {
				// recog_channel->last_result = apr_psprintf(recog_channel->channel->pool,"%s%s",recog_channel->last_result,rslt);
				recog_channel->last_result = apr_pstrcat(recog_channel->channel->pool, recog_channel->last_result,rslt);
			}
		}
		apt_log(RECOG_LOG_MARK,APT_PRIO_INFO,"[xfyun] Get recog result:%s",rslt);

		if(MSP_AUDIO_SAMPLE_LAST == aud_stat && MSP_REC_STATUS_COMPLETE != rec_stat) {
			usleep(150*1000);
			continue;
		}
		break;
	}
	return TRUE;
}
|
发送识别结果
当xfyun_recog_stream_write中检测到语音结束或者没有任何输入时,调用xfyun_recog_recognition_complete发送结束的消息,在该函数中我们就可以读出最终的解析结果发送出去:
1 2 3 4 5 6 7 8 9 10 11 12 13 14 15 16 17 18 19 20 21 22 23 24 25 26 27 28 29 30 31 32 |
/* Load xfyun recognition result */
static apt_bool_t xfyun_recog_result_load(xfyun_recog_channel_t *recog_channel, mrcp_message_t *message)
{
	apt_str_t *body = &message->body;
	if(!recog_channel->last_result) {
		return FALSE;
	}

	body->buf = apr_psprintf(message->pool,
		"<?xml version=\"1.0\"?>\n"
		"<result>\n"
		"  <interpretation confidence=\"%d\">\n"
		"    <instance>%s</instance>\n"
		"    <input mode=\"speech\">%s</input>\n"
		"  </interpretation>\n"
		"</result>\n",
		99,
		recog_channel->last_result,
		recog_channel->last_result);
	if(body->buf) {
		mrcp_generic_header_t *generic_header;
		generic_header = mrcp_generic_header_prepare(message);
		if(generic_header) {
			/* set content type */
			apt_string_assign(&generic_header->content_type,"application/x-nlsml",message->pool);
			mrcp_generic_header_property_add(message,GENERIC_HEADER_CONTENT_TYPE);
		}

		body->length = strlen(body->buf);
	}
	return TRUE;
}
|
端点检测问题
下面的方法进行了语音的端点检测,在实际调试时,有遇到通话的 level 最低始终是 8,低于默认的阈值 2,可以适当的调高默认值,从而避免出现始终不会识别到语音结束的情况。
1 |
MPF_DECLARE(mpf_detector_event_e) mpf_activity_detector_process(mpf_activity_detector_t *detector, const mpf_frame_t *frame) |
重新编译安装后,我们还需要修改配置文件,使用我们自己的 engine。编辑conf/unimrcpserver.xml文件,启用我们自己的 engine:
1 2 |
<engine id="Demo-Recog-1" name="demorecog" enable="false"/> <engine id="XFyun-Recog-1" name="xfyunrecog" enable="true"/> |
运行后就可以看到 xfyunrecog 被加载了。
|
|
|
|||||||||||||||
| 全国咨询热线 | |||||||||||||||||
| 400-1100-266 | |||||||||||||||||
| 在线客服( QQ:340506921 ) | |||||||||||||||||