| 转换器 | 描述 |
|---|---|
| string | (缺省值) 接受任何不包含斜杠的文本 |
| int | 接受正整数 |
| float | 接受正浮点数 |
| path | 类似 string ,但可以包含斜杠 |
| uuid | 接受 UUID 字符串 |
#!/usr/bin/python
# -*- coding: UTF-8 -*-
"""
@author:chenshifeng
@file:flask_demo.py
@time:2021/03/01
"""
from flask import Flask

app = Flask(__name__)


@app.route('/post/int:post_id>')
def show_post(post_id):
 # show the post with the given id, the id is an integer
 return 'Post %d' % post_id

@app.route('/path/path:subpath>')
def show_subpath(subpath):
 # show the subpath after /path/
 return 'Subpath %s' % subpath

if __name__ == '__main__':
 app.run(debug=True)


以下两条规则的不同之处在于是否使用尾部的斜杠。:
@app.route('/projects/')
def projects():
 return 'The project page'

@app.route('/about')
def about():
 return 'The about page'
projects 的 URL 是中规中矩的,尾部有一个斜杠,看起来就如同一个文件夹。 访问一个没有斜杠结尾的 URL 时 Flask 会自动进行重定向,帮你在尾部加上一个斜杠。
about 的 URL 没有尾部斜杠,因此其行为表现与一个文件类似。如果访问这个 URL 时添加了尾部斜杠就会得到一个 404 错误。这样可以保持 URL 唯一,并帮助 搜索引擎避免重复索引同一页面。
url_for()函数对于动态构建特定函数的URL非常有用。该函数接受函数的名称作为第一个参数,以及一个或多个关键字参数,每个参数对应于URL的变量部分。
#!/usr/bin/python
# -*- coding: UTF-8 -*-
"""
@author:chenshifeng
@file:flask_demo.py
@time:2021/03/01
"""
from flask import Flask, redirect, url_for

app = Flask(__name__)

@app.route('/admin')
def hello_admin():
 return 'Hello Admin'

@app.route('/guest/guest>')
def hello_guest(guest):
 return 'Hello %s as Guest' % guest
@app.route('/user/name>')
def hello_user(name):
 if name == 'admin':
 return redirect(url_for('hello_admin'))
 else:
 return redirect(url_for('hello_guest', guest=name))
if __name__ == '__main__':
 app.run(debug=True)
redirect函数用于重定向,实现机制很简单,就是向客户端(浏览器)发送一个重定向的HTTP报文,浏览器会去访问报文中指定的url。
运行
打开浏览器并输入URL - http://localhost:5000/user/admin
Hello Admin
在浏览器中输入以下URL - http://localhost:5000/user/mvl
Hello mvl as Guest
Web 应用使用不同的 HTTP 方法处理 URL 。当你使用 Flask 时,应当熟悉 HTTP 方法。 缺省情况下,一个路由只回应 GET 请求。 可以使用 route() 装饰器的 methods 参数来处理不同的 HTTP 方法:
| 方法 | 描述 |
|---|---|
| GET | 以未加密的形式将数据发送到服务器,最常见的方法。 |
| HEAD | 和GET方法相同,但没有响应体。 |
| POST | 用于将HTML表单数据发送到服务器,POST方法接收的数据不由服务器缓存。 |
| PUT | 用上传的内容替换目标资源的所有当前表示。 |
| DELETE | 删除由URL给出的目标资源的所有当前表示。 |
默认情况下,Flask路由响应GET请求。但是,可以通过为route()装饰器提供方法参数来更改此首选项。
为了演示在URL路由中使用POST方法,首先让我们创建一个HTML表单,并使用POST方法将表单数据发送到URL。
将以下脚本另存为login.html
html>
 body>

 form action = "http://localhost:5000/login" method = "post">
 p>Enter Name:/p>
 p>input type = "text" name = "nm" />/p>
 p>input type = "submit" value = "submit" />/p>
 /form>

 /body>
/html>
运行以下代码
from flask import Flask, redirect, url_for, request
app = Flask(__name__)

@app.route('/success/name>')
def success(name):
 return 'welcome %s' % name

@app.route('/login',methods = ['POST', 'GET'])
def login():
 if request.method == 'POST':
 user = request.form['nm']
 return redirect(url_for('success',name = user))
 else:
 user = request.args.get('nm')
 return redirect(url_for('success',name = user))

if __name__ == '__main__':
 app.run(debug = True)
在浏览器中打开login.html,在文本字段中输入name,然后单击提交。

表单数据将POST到表单标签的action子句中的URL。
http://localhost/login映射到login()函数。由于服务器通过POST方法接收数据,因此通过以下步骤获得从表单数据获得的“nm”参数的值:
表单数据将POST到表单标签的action子句中的URL。
user = request.form['nm']
它作为变量部分传递给'/ success' URL。浏览器在窗口中显示welcome消息。

在login.html中将方法参数更改为'GET',然后在浏览器中再次打开它。服务器上接收的数据是通过GET方法获得的。通过以下的步骤获得'nm'参数的值:
User = request.args.get('nm')
这里,args是包含表单参数对及其对应值对的列表的字典对象。与'nm'参数对应的值将像之前一样传递到'/ success' URL。
在大型应用中,把业务逻辑和表现内容放在一起,会增加代码的复杂度和维护成本.
使用模板的好处
视图函数只负责业务逻辑和数据处理(业务逻辑方面)而模板则取到视图函数的数据结果进行展示(视图展示方面)代码结构清晰,耦合度低
使用 render_template() 方法可以渲染模板,你只要提供模板名称和需要 作为参数传递给模板的变量就行了。
Flask 会在 templates 文件夹内寻找模板。因此,如果你的应用是一个模块, 那么模板文件夹应该在模块旁边;如果是一个包,那么就应该在包里面:
情形 1 : 一个模块:
/application.py
/templates
 /hello.html
情形 2 : 一个包:
/application
 /__init__.py
 /templates
 /hello.html
示例代码:
from flask import Flask, render_template

app = Flask(__name__)

@app.route('/')
def index():
 my_int = 18
 my_str = 'curry'
 my_list = [1, 5, 4, 3, 2]
 my_dict = {
 'name': 'durant',
 'age': 28
 }

 # render_template方法:渲染模板
 # 参数1: 模板名称 参数n: 传到模板里的数据
 return render_template('hello.html',
  my_int=my_int,
  my_str=my_str,
  my_list=my_list,
  my_dict=my_dict)


if __name__ == '__main__':
 app.run(debug=True)
!DOCTYPE html>
html lang="en">
head>
meta charset="UTF-8">
title>Title/title>
/head>
body>
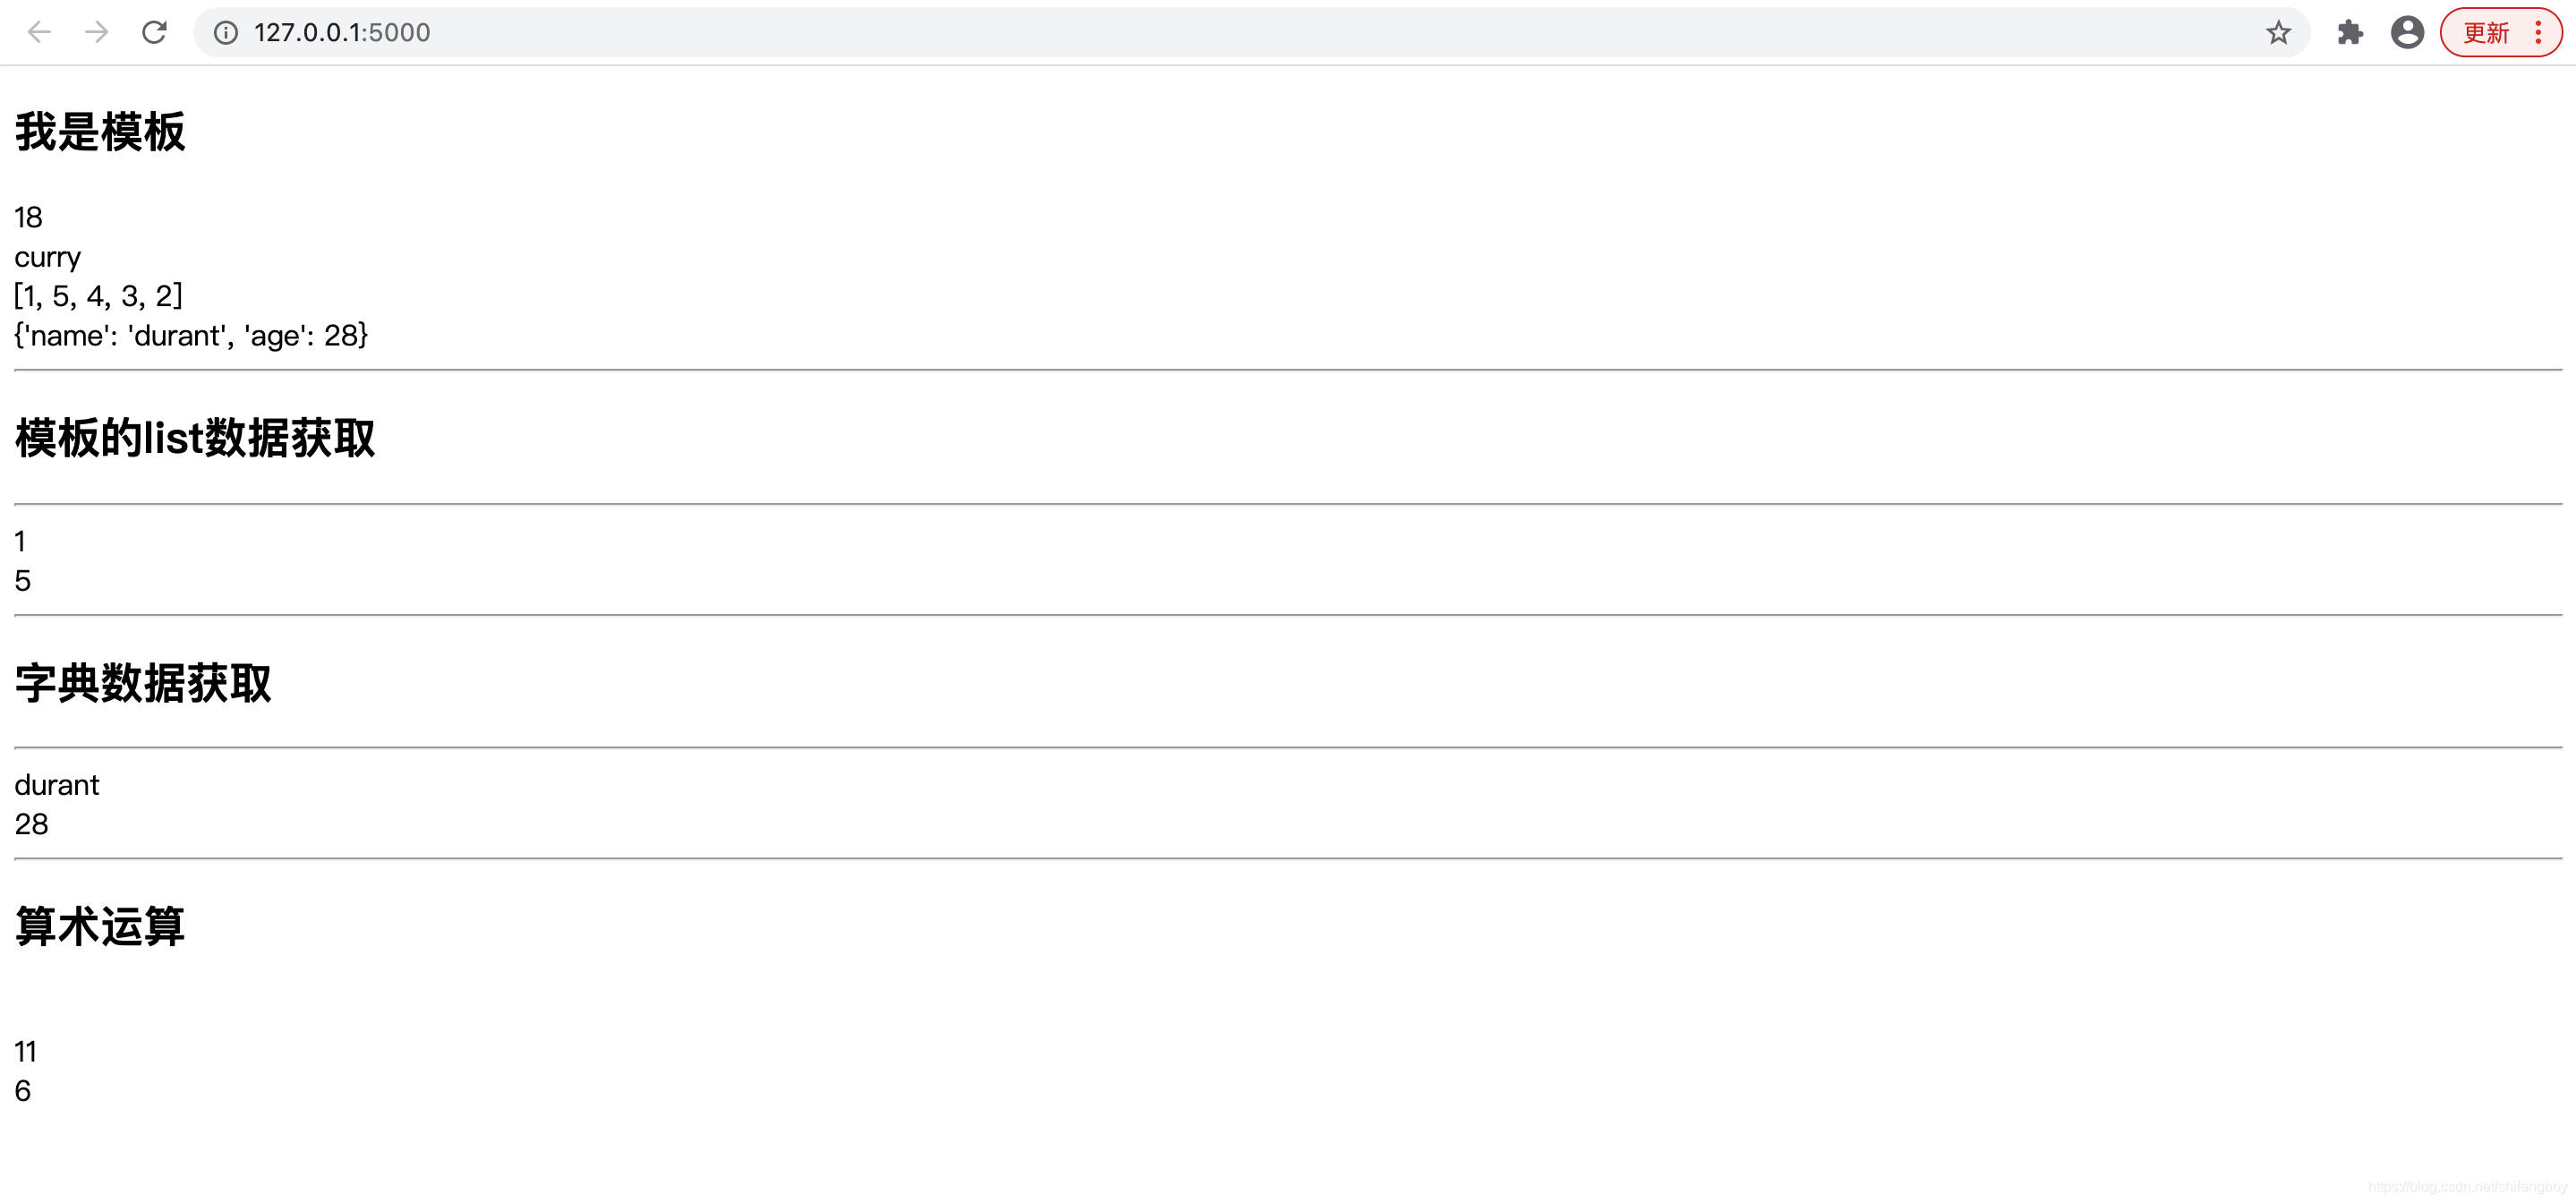
h2>我是模板/h2>
{{ my_int }}
br>
{{ my_str }}
br>
{{ my_list }}
br>
{{ my_dict }}
hr>
h2>模板的list数据获取/h2>
hr>
{{ my_list[0] }}
br>
{{ my_list.1 }}
hr>
h2>字典数据获取/h2>
hr>
{{ my_dict['name'] }}
br>
{{ my_dict.age }}
hr>
h2>算术运算/h2>
br>
{{ my_list.0 + 10 }}
br>
{{ my_list[0] + my_list.1 }}
/body>
/html>
运行效果:
动态的 web 应用也需要静态文件,一般是 CSS 和 JavaScript 文件。理想情况下你的 服务器已经配置好了为你的提供静态文件的服务。但是在开发过程中, Flask 也能做好 这项工作。只要在你的包或模块旁边创建一个名为 static 的文件夹就行了。 静态文件位于应用的 /static 中。
使用特定的 'static' 端点就可以生成相应的 URL
url_for('static', filename='style.css')
这个静态文件在文件系统中的位置应该是 static/style.css 。
在下面的示例中,在index.html中的HTML按钮的OnClick事件上调用hello.js中定义的javascript函数,该函数在Flask应用程序的“/”URL上呈现。
from flask import Flask, render_template
app = Flask(__name__)

@app.route("/")
def index():
 return render_template("index.html")

if __name__ == '__main__':
 app.run(debug = True)
index.html的HTML脚本如下所示:
html>
head>
script type = "text/javascript"
src = "{{ url_for('static', filename = 'hello.js') }}" >/script>
/head>
body>
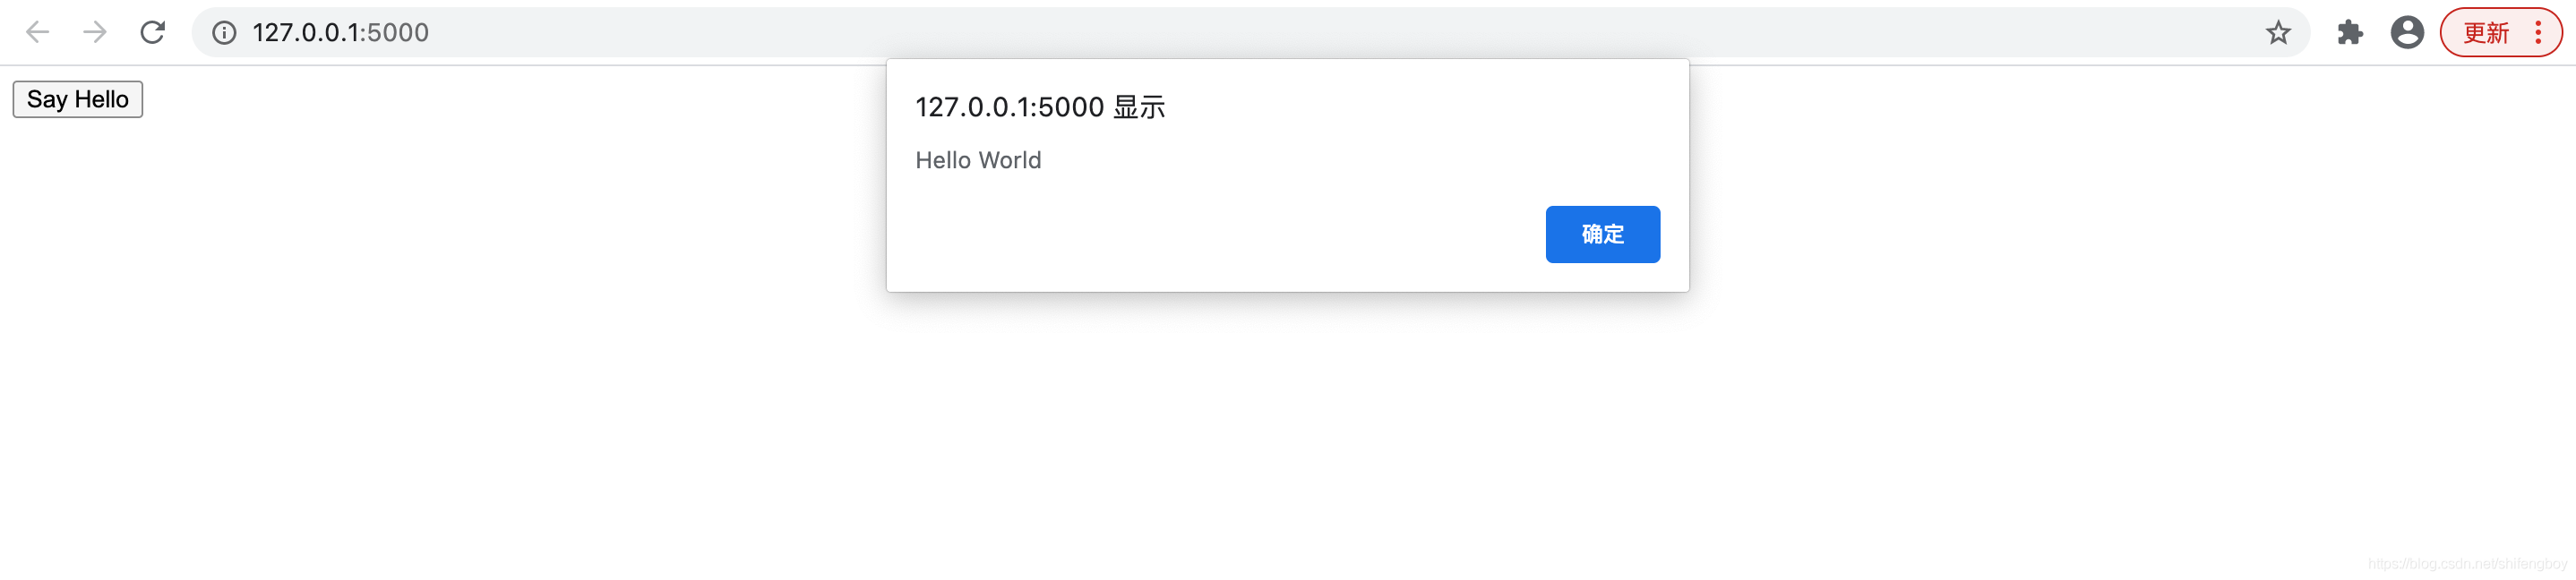
input type = "button" onclick = "sayHello()" value = "Say Hello" />
/body>
/html>
Hello.js包含sayHello()函数。
function sayHello() {
 alert("Hello World")
}
运行效果:
来自客户端网页的数据作为全局请求对象发送到服务器。为了处理请求数据,应该从Flask模块导入。
Request对象的重要属性如下所列:
首先,你必须从 flask 模块导入请求对象:
from flask import request
我们已经看到,可以在 URL 规则中指定 http 方法。触发函数接收的 Form 数据可以以字典对象的形式收集它并将其转发到模板以在相应的网页上呈现它。
在以下示例中,'/' URL 会呈现具有表单的网页(student.html)。填入的数据会发布到触发 result() 函数的 '/result' URL。
result() 函数收集字典对象中的 request.form 中存在的表单数据,并将其发送给 result.html。
该模板动态呈现表单数据的 HTML 表格。
下面给出的是应用程序的 Python 代码:
from flask import Flask, render_template, request
app = Flask(__name__)
@app.route('/')
def student():
 return render_template('student.html')


@app.route('/result',methods = ['POST', 'GET'])
def result():
 if request.method == 'POST':
 result = request.form
 return render_template("result.html",result = result)


if __name__ == '__main__':
 app.run(debug = True)
下面给出的是 student.html 的 HTML 脚本。
!DOCTYPE html>
html lang="en">
head>
 meta charset="UTF-8">
 title>Title/title>
/head>
body>
 form action="http://localhost:5000/result" method="POST">
 p>Name input type = "text" name = "Name" />/p>
 p>Physics input type = "text" name = "Physics" />/p>
 p>Chemistry input type = "text" name = "chemistry" />/p>
 p>Maths input type ="text" name = "Mathematics" />/p>
 p>input type = "submit" value = "submit" />/p>
 /form>
/body>
/html>
下面给出了模板( result.html )的代码:
!doctype html>
 table border = 1>
 {% for key, value in result.items() %}
 tr>
 th> {{ key }} /th>
 td> {{ value }}/td>
 /tr>
 {% endfor %}
/table>
运行效果:
运行 Python 脚本,并在浏览器中输入 URL http://localhost:5000/。
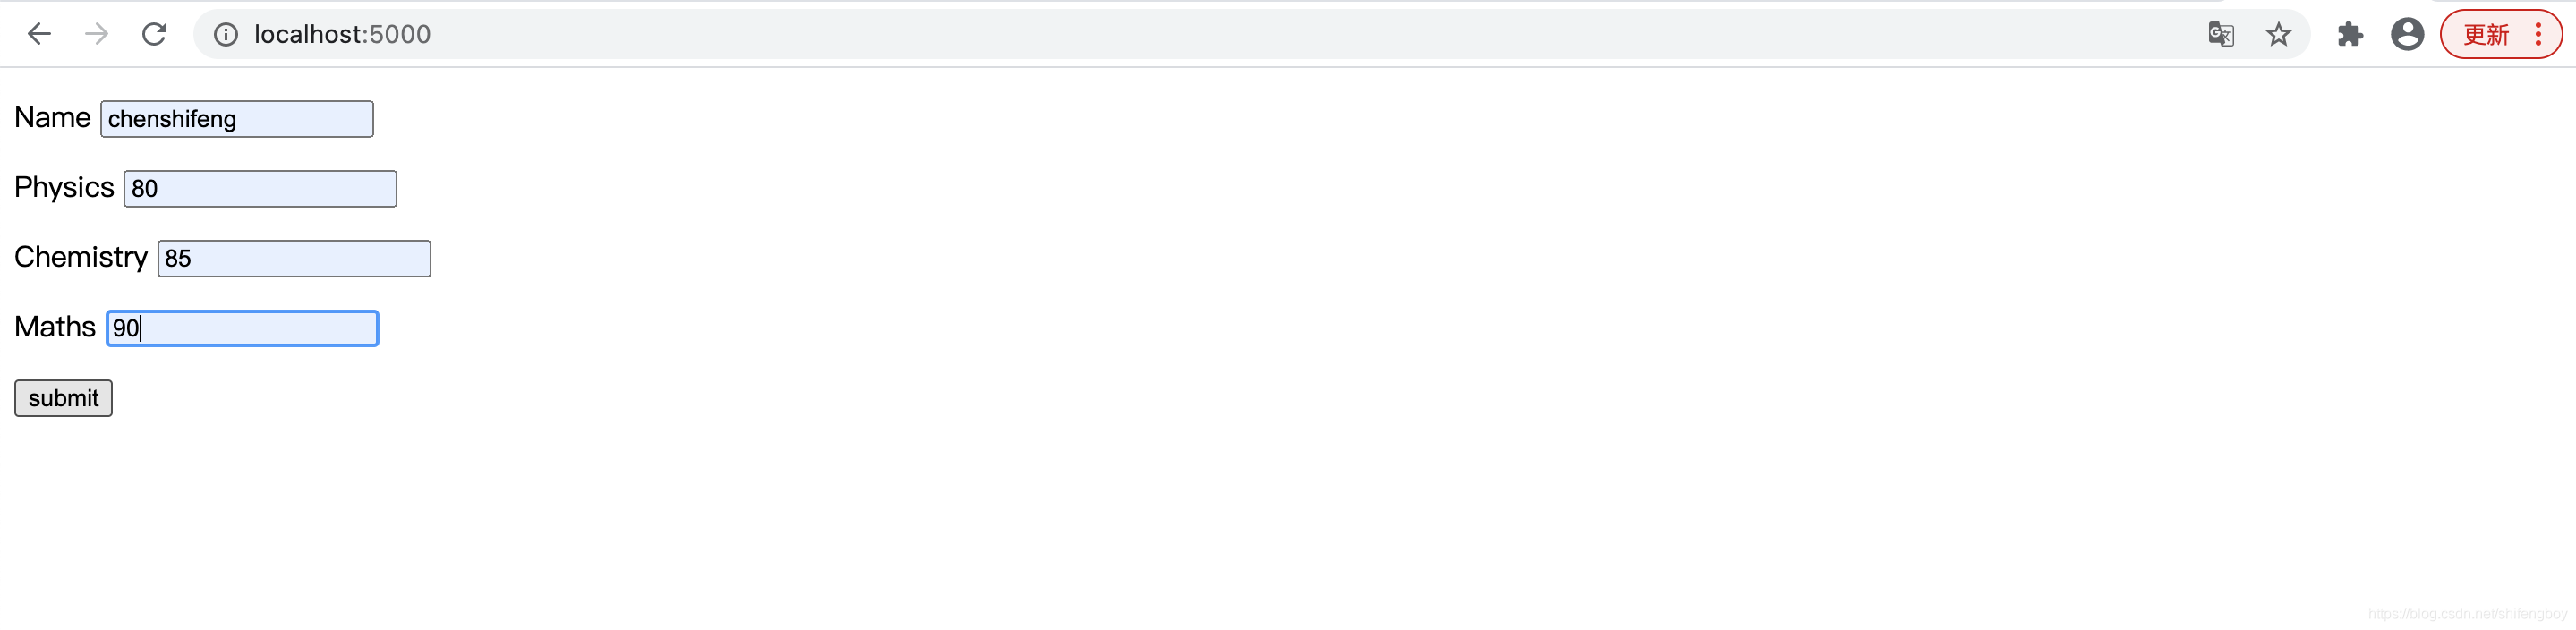
当点击提交按钮时,表单数据以 HTML 表格的形式呈现在 result.html 上。

Cookie以文本文件的形式存储在客户端的计算机上。其目的是记住和跟踪与客户使用相关的数据,以获得更好的访问者体验和网站统计信息。
Request对象包含Cookie的属性。它是所有cookie变量及其对应值的字典对象,客户端已传输。除此之外,cookie还存储其网站的到期时间,路径和域名。
在Flask中,对cookie的处理步骤为:
1.设置cookie:
设置cookie,默认有效期是临时cookie,浏览器关闭就失效
可以通过 max_age 设置有效期, 单位是秒
cookie_1 = request.cookies.get("chenshifeng")
2.获取cookie
获取cookie,通过request.cookies的方式, 返回的是一个字典,可以获取字典里的相应的值
resp = make_response("del success") # 设置响应体
resp.delete_cookie("chenshifeng")
3.删除cookie
这里的删除只是让cookie过期,并不是直接删除cookie
删除cookie,通过delete_cookie()的方式, 里面是cookie的名字
resp = make_response("del success") # 设置响应体
resp.delete_cookie("chenshifeng")
以下为Flask Cookies的简单示例:
from flask import Flask, make_response, request

app = Flask(__name__)

@app.route("/set_cookies")
def set_cookie():
 resp = make_response("success")
 resp.set_cookie("chenshifeng", "shifengboy",max_age=3600)
 return resp

@app.route("/get_cookies")
def get_cookie():
 cookie_1 = request.cookies.get("chenshifeng") # 获取名字为Itcast_1对应cookie的值
 return cookie_1

@app.route("/delete_cookies")
def delete_cookie():
 resp = make_response("del success")
 resp.delete_cookie("chenshifeng")

 return resp

if __name__ == '__main__':
 app.run(debug=True)
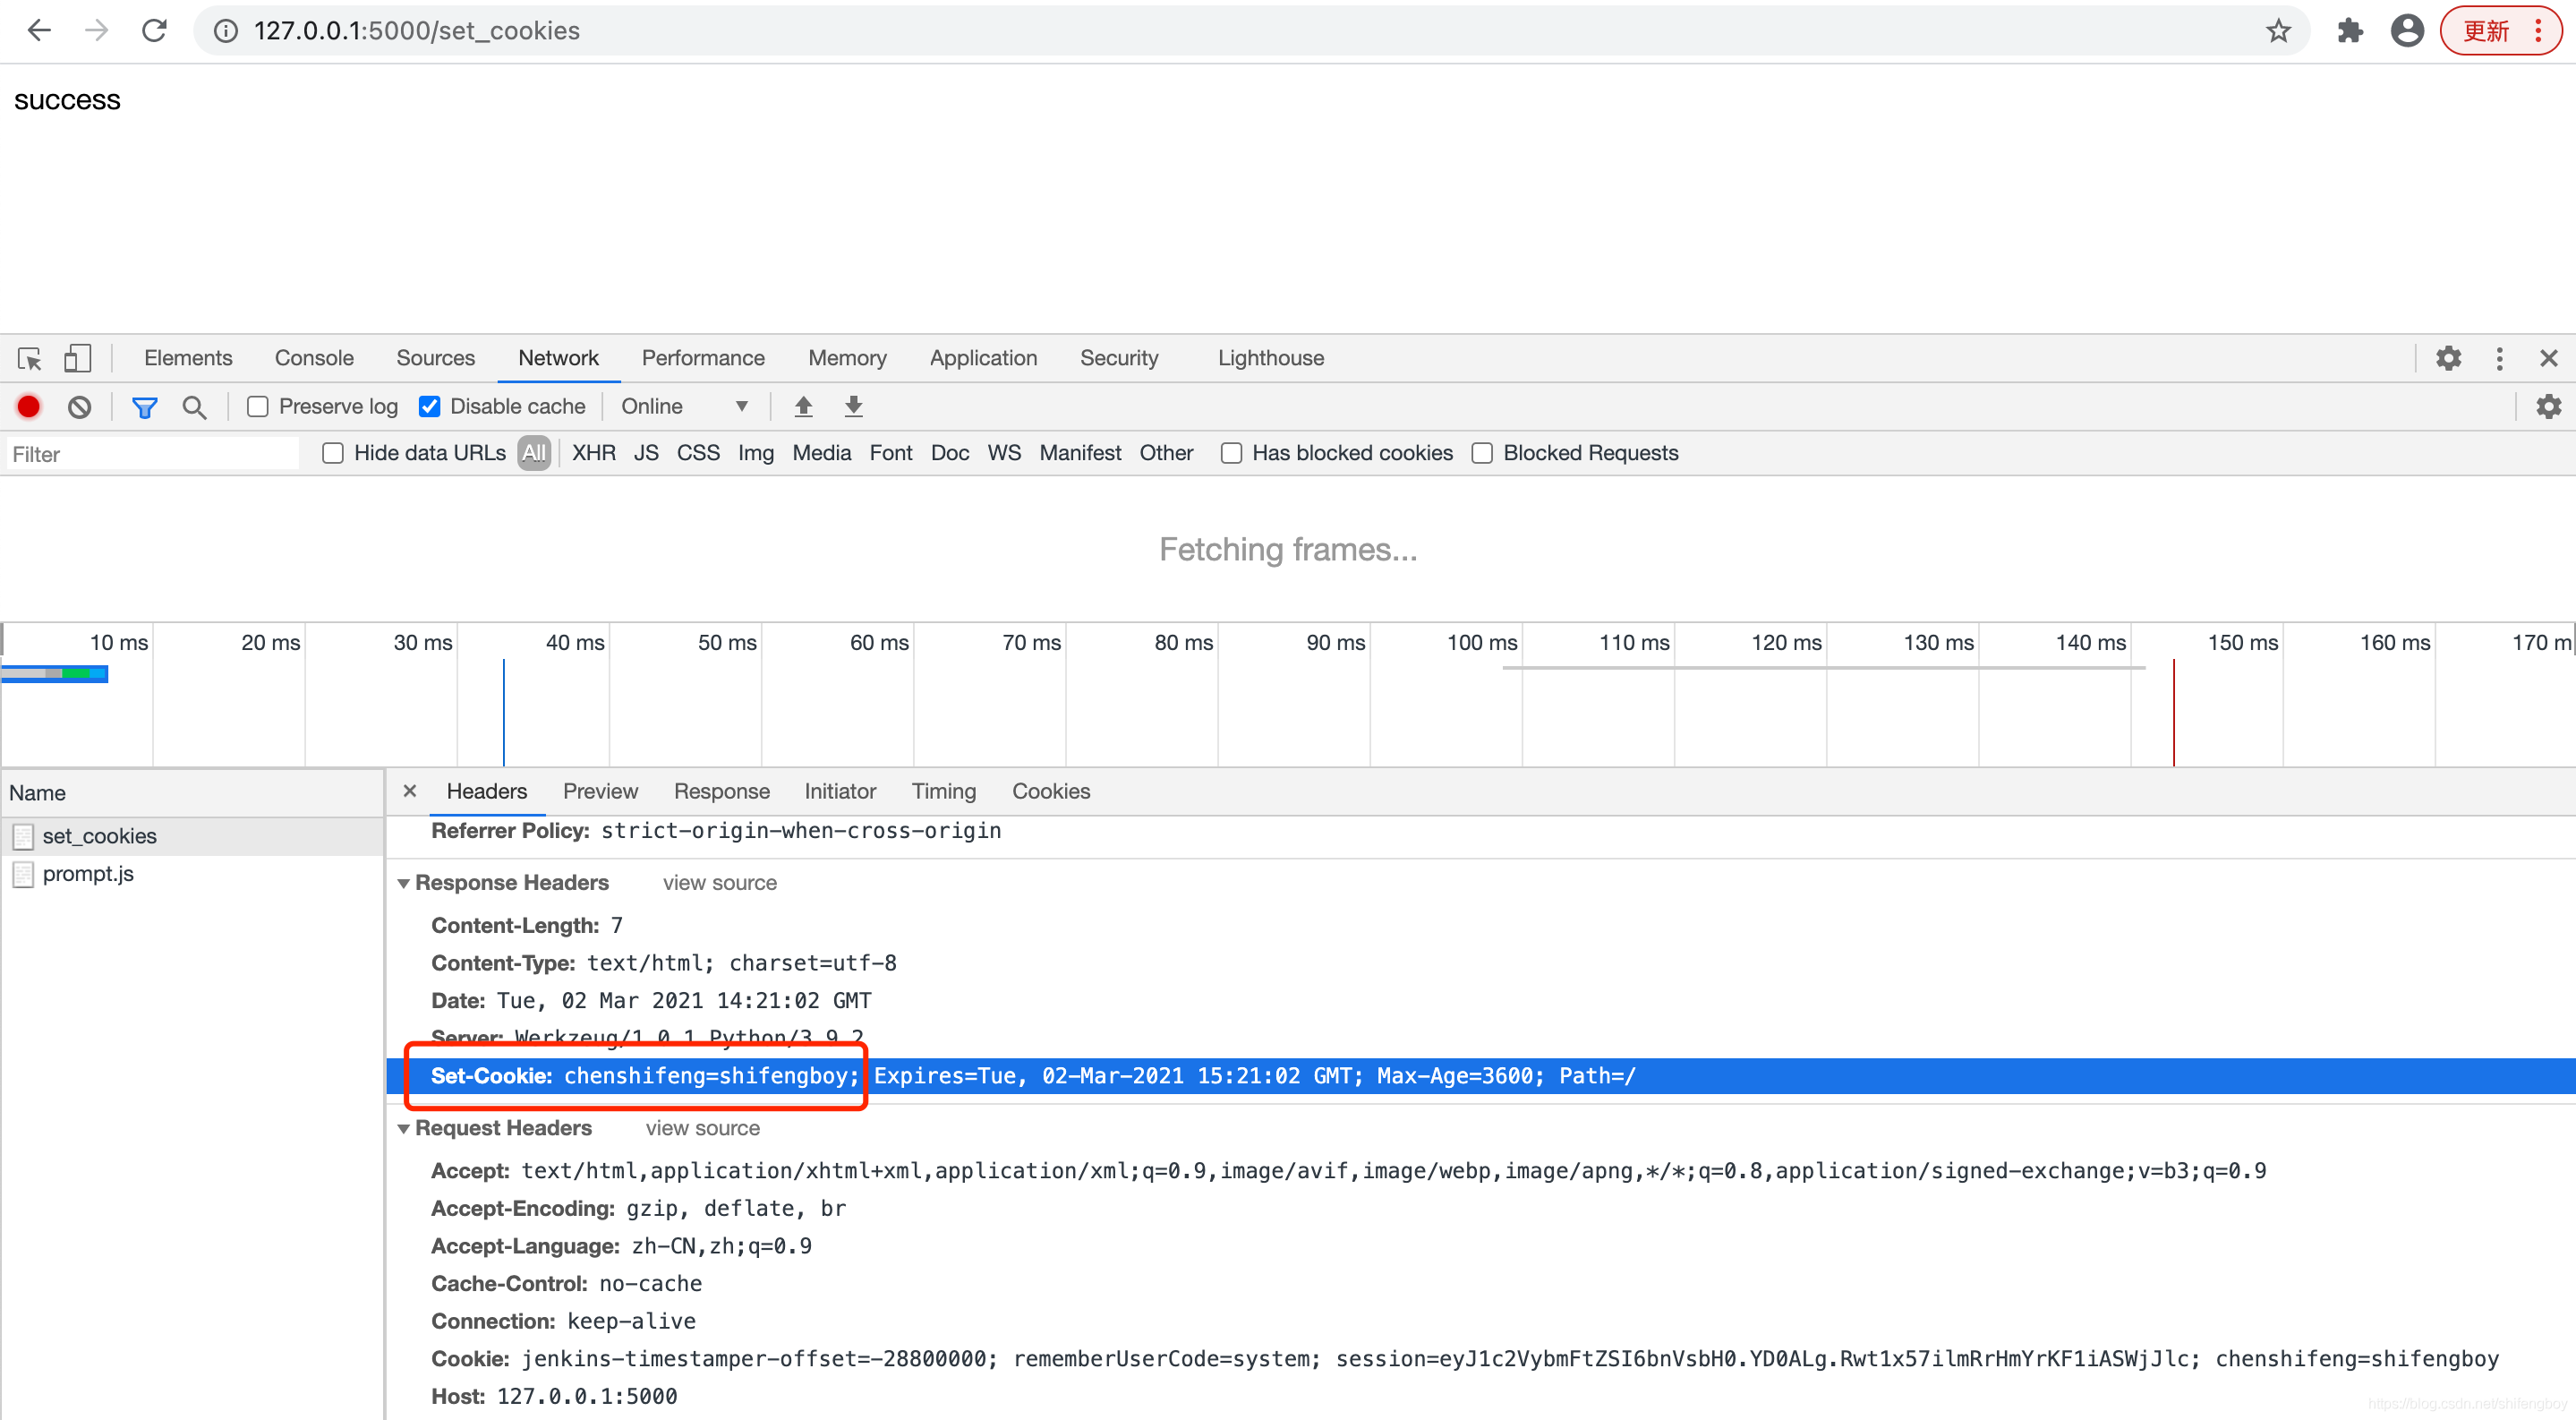
设置cookies
运行应用程序,在浏览器中输入 127.0.0.1:5000/set_cookies 来设置cookies,设置 cookies 的输出如下所示:
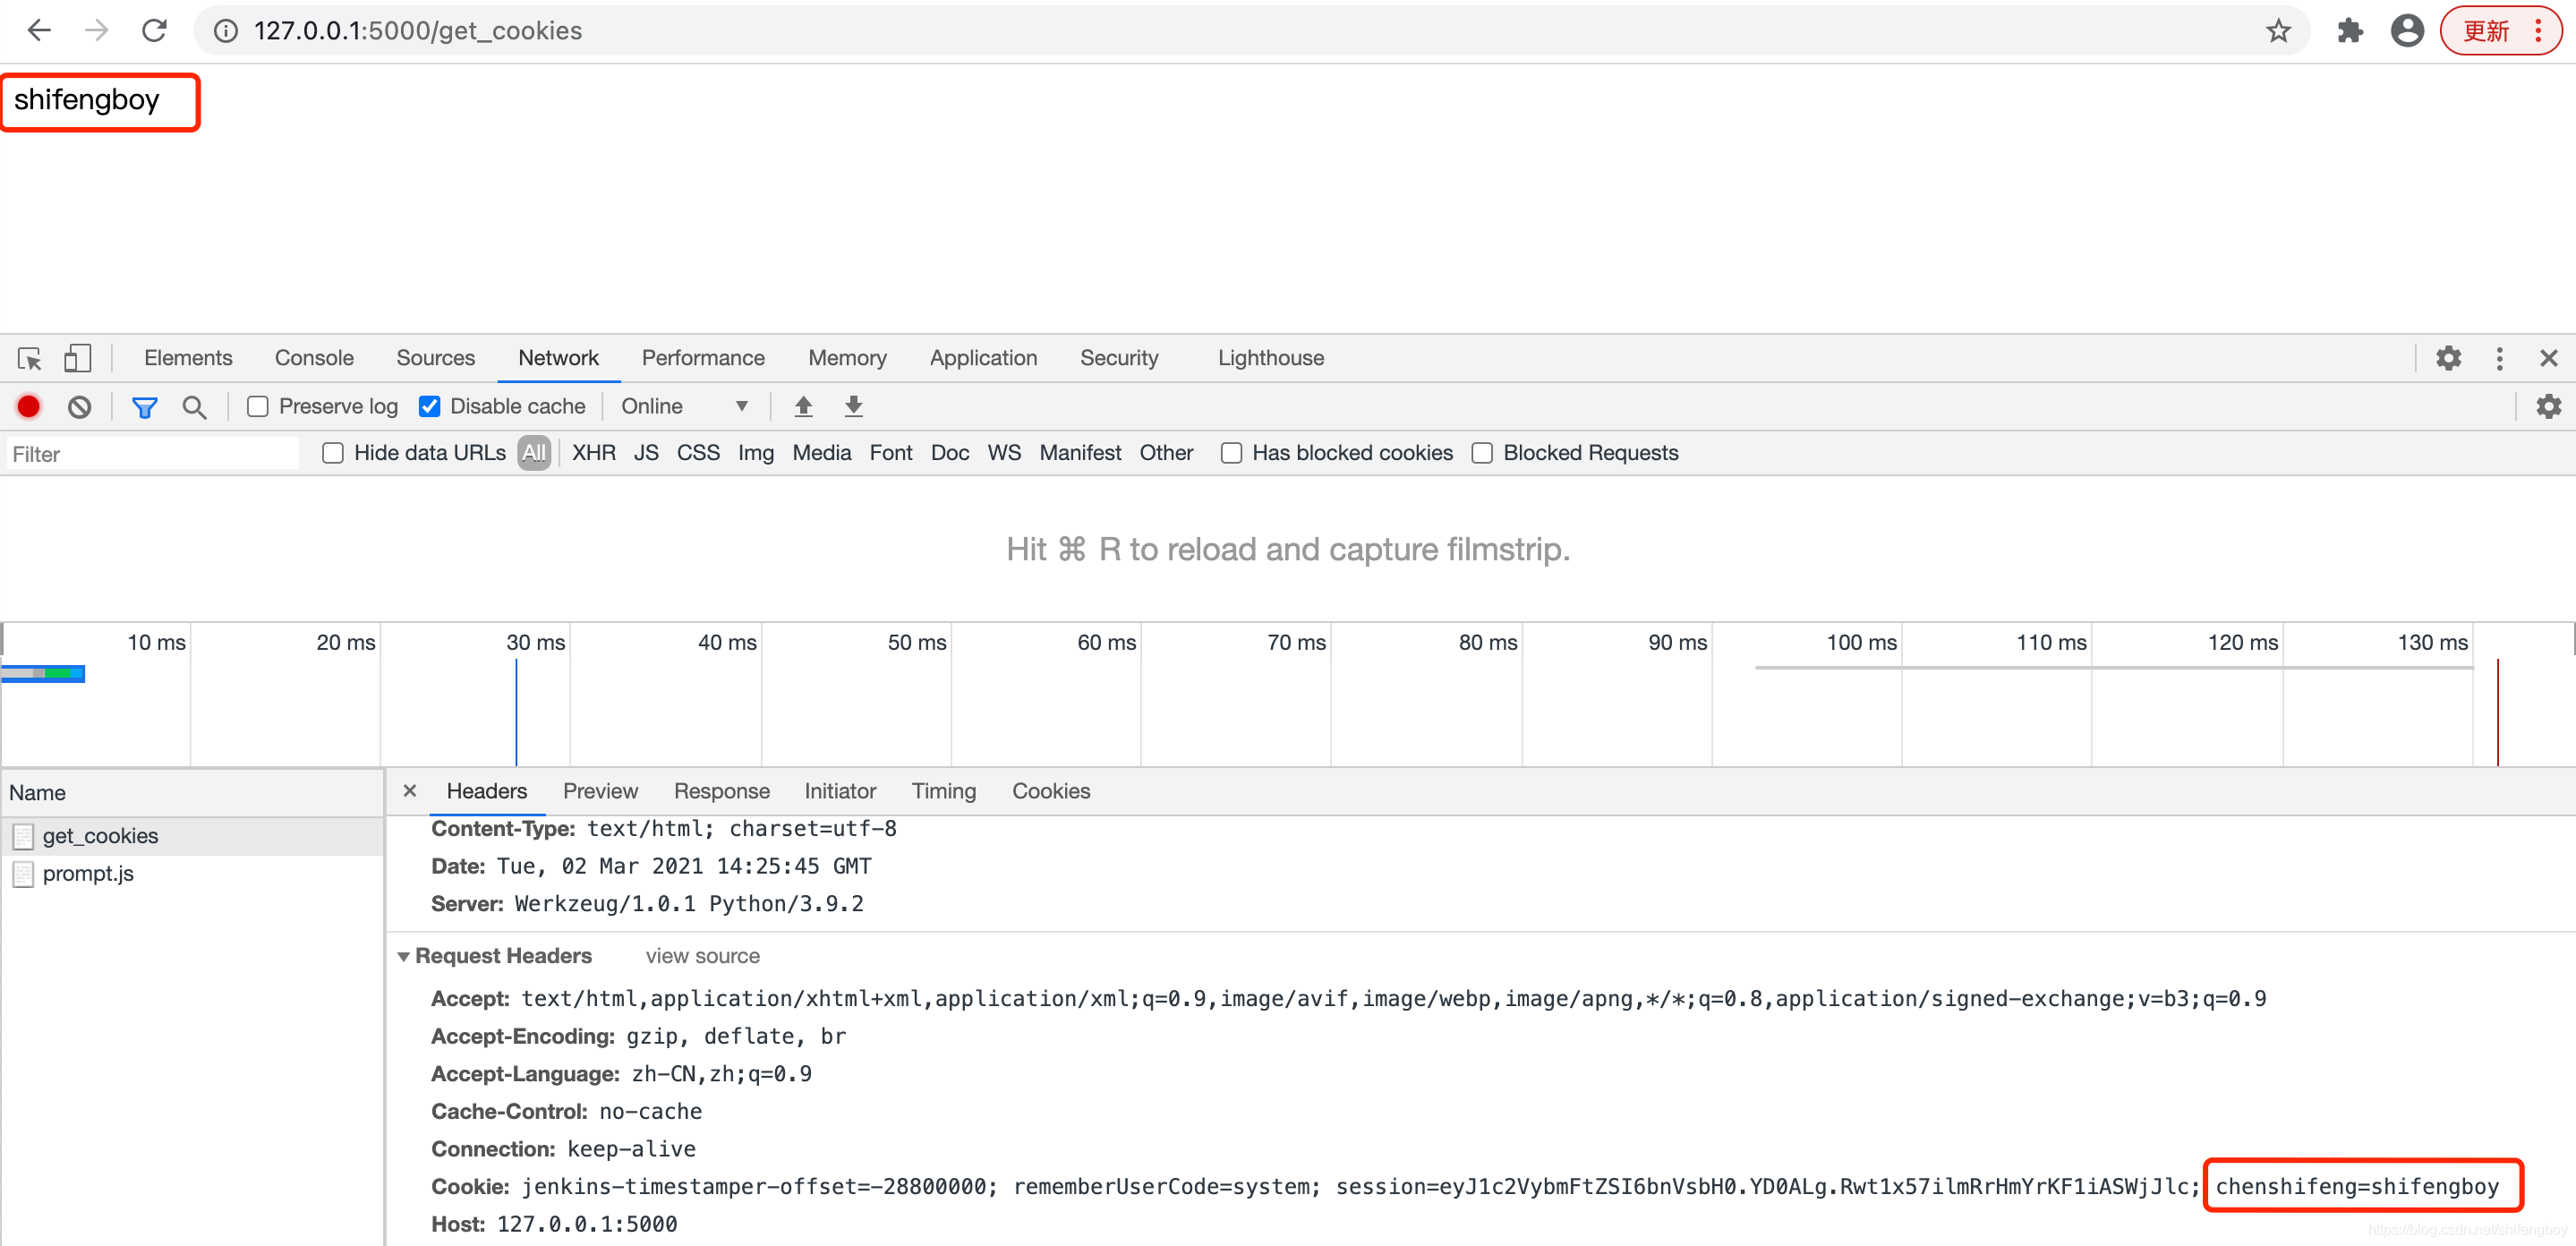
获取cookie
根据视图函数中相对应的路径,输入 http://127.0.0.1:5000/get_cookies ,读回 cookies 的输出如下所示:
删除cookie
根据视图函数中相对应的路径,输入 http://127.0.0.1:5000/delete_cookies ,删除 cookies 的输出如下所示:
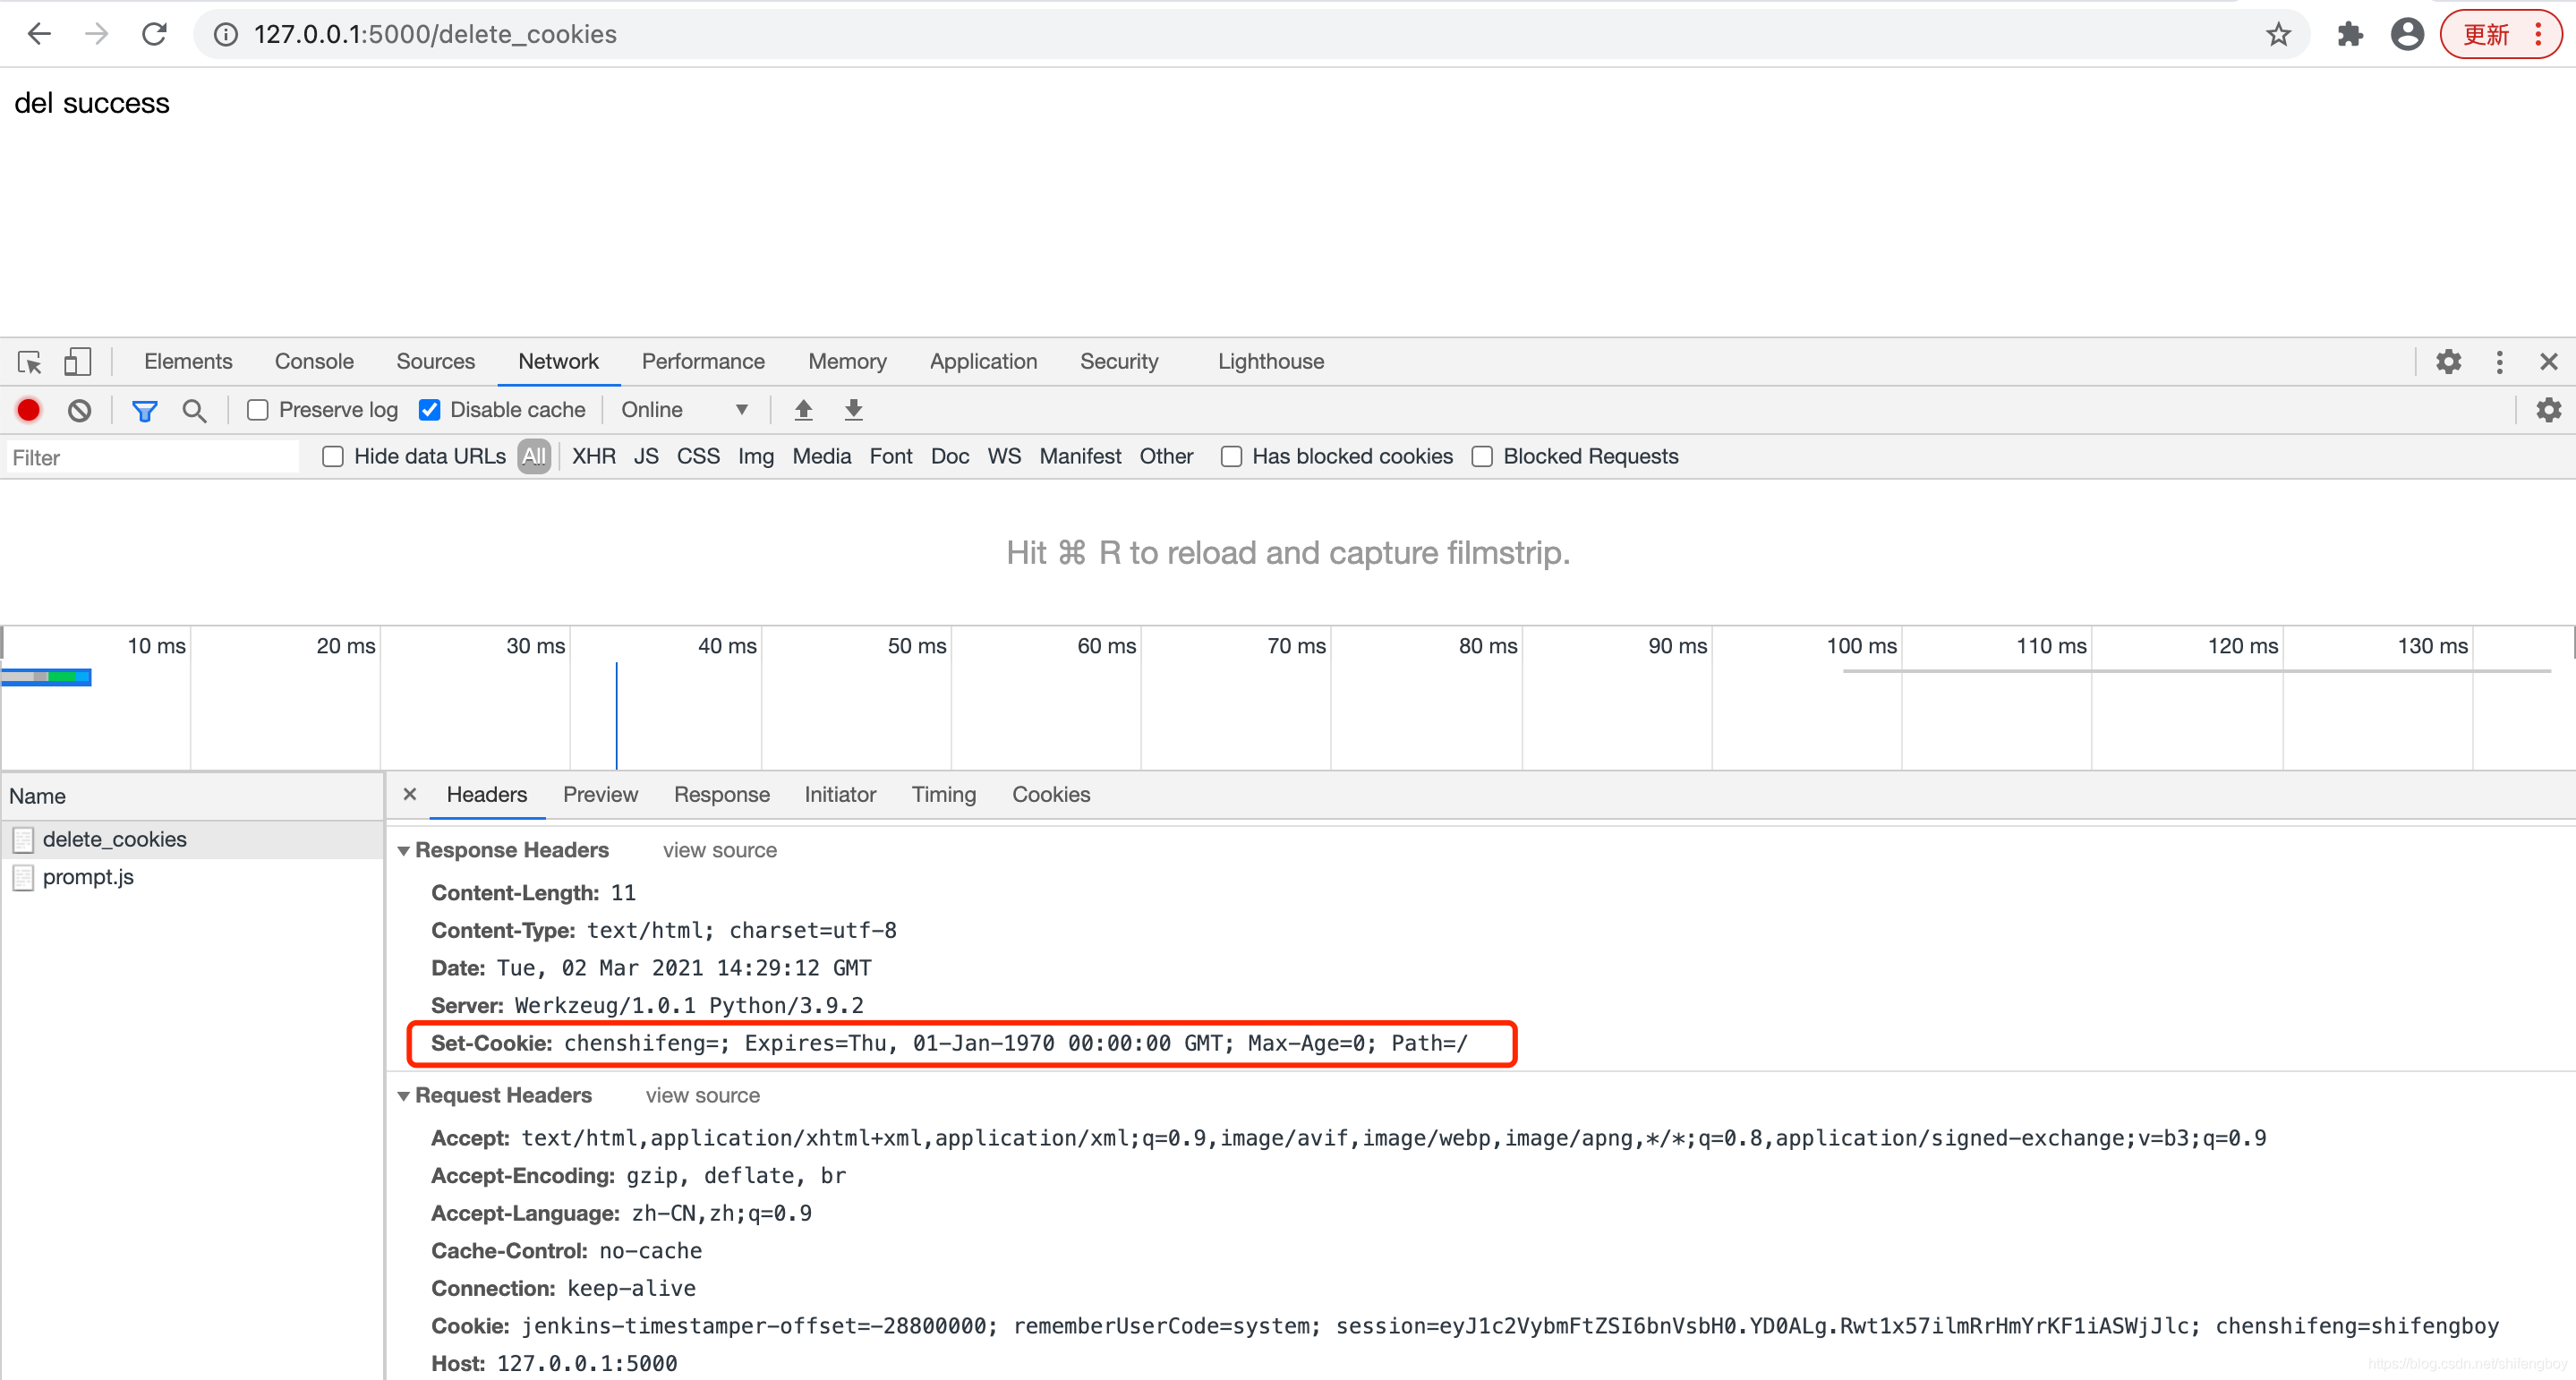
注意删除,只是让 cookie 过期。
与Cookie不同,Session(会话)数据存储在服务器上。会话是客户端登录到服务器并注销服务器的时间间隔。需要在该会话中保存的数据会存储在服务器上的临时目录中。
为每个客户端的会话分配会话ID。会话数据存储在cookie的顶部,服务器以加密方式对其进行签名。对于此加密,Flask应用程序需要一个定义的SECRET_KEY。
Session对象也是一个字典对象,包含会话变量和关联值的键值对。
例如,要设置一个'username'会话变量,请使用以下语句:
Session['username'] = 'admin'
要释放会话变量,请使用pop()方法。
session.pop('username', None)
演示代码:
from flask import Flask, session, redirect, url_for, request

app = Flask(__name__)

app.secret_key = 'fkdjsafjdkfdlkjfadskjfadskljdsfklj' # 确保设置应用程序的secret_key


@app.route('/')
def index():
 if 'username' in session:
 username = session['username']

 return '登录用户名是:' + username + 'br>' + \

  "b>a href = '/logout'>点击这里注销/a>/b>"

 return "您暂未登录, br>a href = '/login'>/b>" + \

  "点击这里登录/b>/a>"


@app.route('/login', methods=['GET', 'POST'])
def login():
 if request.method == 'POST':
 session['username'] = request.form['username']

 return redirect(url_for('index'))

 return '''

 form action = "" method = "post">

 p>input type ="text" name ="username"/>/p>

 p>input type ="submit" value ="登录"/>/p>

 /form>

 '''


@app.route('/logout')
def logout():
 # remove the username from the session if it is there

 session.pop('username', None)

 return redirect(url_for('index'))


if __name__ == '__main__':
 app.run(debug=True)
如何生成一个好的密钥
生成随机数的关键在于一个好的随机种子,因此一个好的密钥应当有足够的随机性。 操作系统可以有多种方式基于密码随机生成器来生成随机数据。使用下面的命令 可以快捷的为 Flask.secret_key ( 或者 SECRET_KEY )生成值:
$ python -c 'import os; print(os.urandom(16))'
b'_5#y2L"F4Q8z\n\xec]/'
访问http://127.0.0.1:5000/,只是提示用户登录,因为未设置会话变量'username'。

当用户点击登录,浏览到“/login”login()视图函数时,因为它是通过GET方法调用的,所以将打开一个登录表单。

点击登录,通过POST方法将表单发送回'/login',现在会话变量已设置。应用程序重定向到'/'。此时会话变量'username'被找到。

应用程序还包含一个logout()视图函数,它会弹出'username'会话变量。因此,'/' URL再次显示开始页面。

Flask类有一个redirect()函数。调用时,它返回一个响应对象,并将用户重定向到具有指定状态代码的另一个目标位置。
redirect()函数的原型如下:
Flask.redirect(location, statuscode, response)
在上述函数中:
以下状态代码已标准化:
默认状态代码为302,表示'found'。
在以下示例中,redirect()函数用于在登录尝试失败时再次显示登录页面。
from flask import Flask, redirect, url_for, render_template, request

# Initialize the Flask application
app = Flask(__name__)


@app.route('/')
def index():
 return render_template('log_in.html')


@app.route('/login', methods=['POST', 'GET'])
def login():
 if request.method == 'POST' and request.form['username'] == 'admin':
  return redirect(url_for('success'))
 return redirect(url_for('index'))

@app.route('/success')
def success():
 return 'logged in successfully'

if __name__ == '__main__':
 app.run(debug=True)
下面给出的是 log_in.html的 HTML 脚本。
!DOCTYPE html>
html lang="en">
head>
 meta charset="UTF-8">
 title>Title/title>
/head>
body>
  form action = "http://localhost:5000/login" method = "POST">
   p>Enter Name:/p>
   p>input type = "text" name = "username" />/p>
   p>input type = "submit" value = "submit" />/p>
  /form>
/body>
/html>
Flask类具有带有错误代码的abort()函数。
Flask.abort(code)
Code参数采用以下值之一:
让我们对上述代码中的login()函数稍作更改。如果要显示'Unauthurized'页面,请将其替换为调用abort(401),而不是重新显示登录页面。
from flask import Flask, redirect, url_for, render_template, request, abort

app = Flask(__name__)

@app.route('/')
def index():
 return render_template('log_in.html')

@app.route('/login', methods=['POST', 'GET'])
def login():
 if request.method == 'POST':
  if request.form['username'] == 'admin':
   return redirect(url_for('success'))
  else:
   abort(401)
 else:
  return redirect(url_for('index'))

@app.route('/success')
def success():
 return 'logged in successfully'

if __name__ == '__main__':
 app.run(debug=True)
运行,输入非admin的用户名,点击提交

一个好的基于 GUI 的应用程序会向用户提供有关交互的反馈。例如,桌面应用程序使用对话框或消息框,JavaScript 使用警报用于类似目的。
在 Flask Web 应用程序中生成这样的信息性消息很容易。Flask 框架的闪现系统可以在一个视图中创建消息,并在名为 next 的视图函数中呈现它。
Flask 模块包含 flash() 方法。它将消息传递给下一个请求,该请求通常是一个模板。
flash(message, category)
其中,
以下是一个完整的示例:
from flask import Flask, flash, redirect, render_template, \

  request, url_for

app = Flask(__name__)
app.secret_key = b'_5#y2L"F4Q8z\n\xec]/'

@app.route('/')
def index():
 return render_template('index.html')

@app.route('/login', methods=['GET', 'POST'])
def login():
 error = None
 if request.method == 'POST':
  if request.form['username'] != 'admin' or \

   request.form['password'] != 'secret':
   error = 'Invalid credentials'
  else:
   flash('You were successfully logged in')
   return redirect(url_for('index'))
 return render_template('login.html', error=error)

if __name__ == '__main__':
 app.run(debug=True)
以下是实现闪现的 layout.html 模板:
!doctype html>
title>My Application/title>
{% with messages = get_flashed_messages() %}
 {% if messages %}
 ul class=flashes>
 {% for message in messages %}
  li>{{ message }}/li>
 {% endfor %}
 /ul>
 {% endif %}
{% endwith %}
{% block body %}{% endblock %}
以下是继承自 layout.html 的 index.html 模板:
{% block body %}
 h1>Overview/h1>
 p>Do you want to a href="{{ url_for('login') }}">log in?/a>
{% endblock %}
以下是同样继承自 layout.html 的 login.html 模板:
{% extends "layout.html" %}
{% block body %}
 h1>Login/h1>
 {% if error %}
 p class=error>strong>Error:/strong> {{ error }}
 {% endif %}
 form method=post>
 dl>
  dt>Username:
  dd>input type=text name=username value="{{
   request.form.username }}">
  dt>Password:
  dd>input type=password name=password>
 /dl>
 p>input type=submit value=Login>
 /form>
{% endblock %}
运行
首页

登录报错页
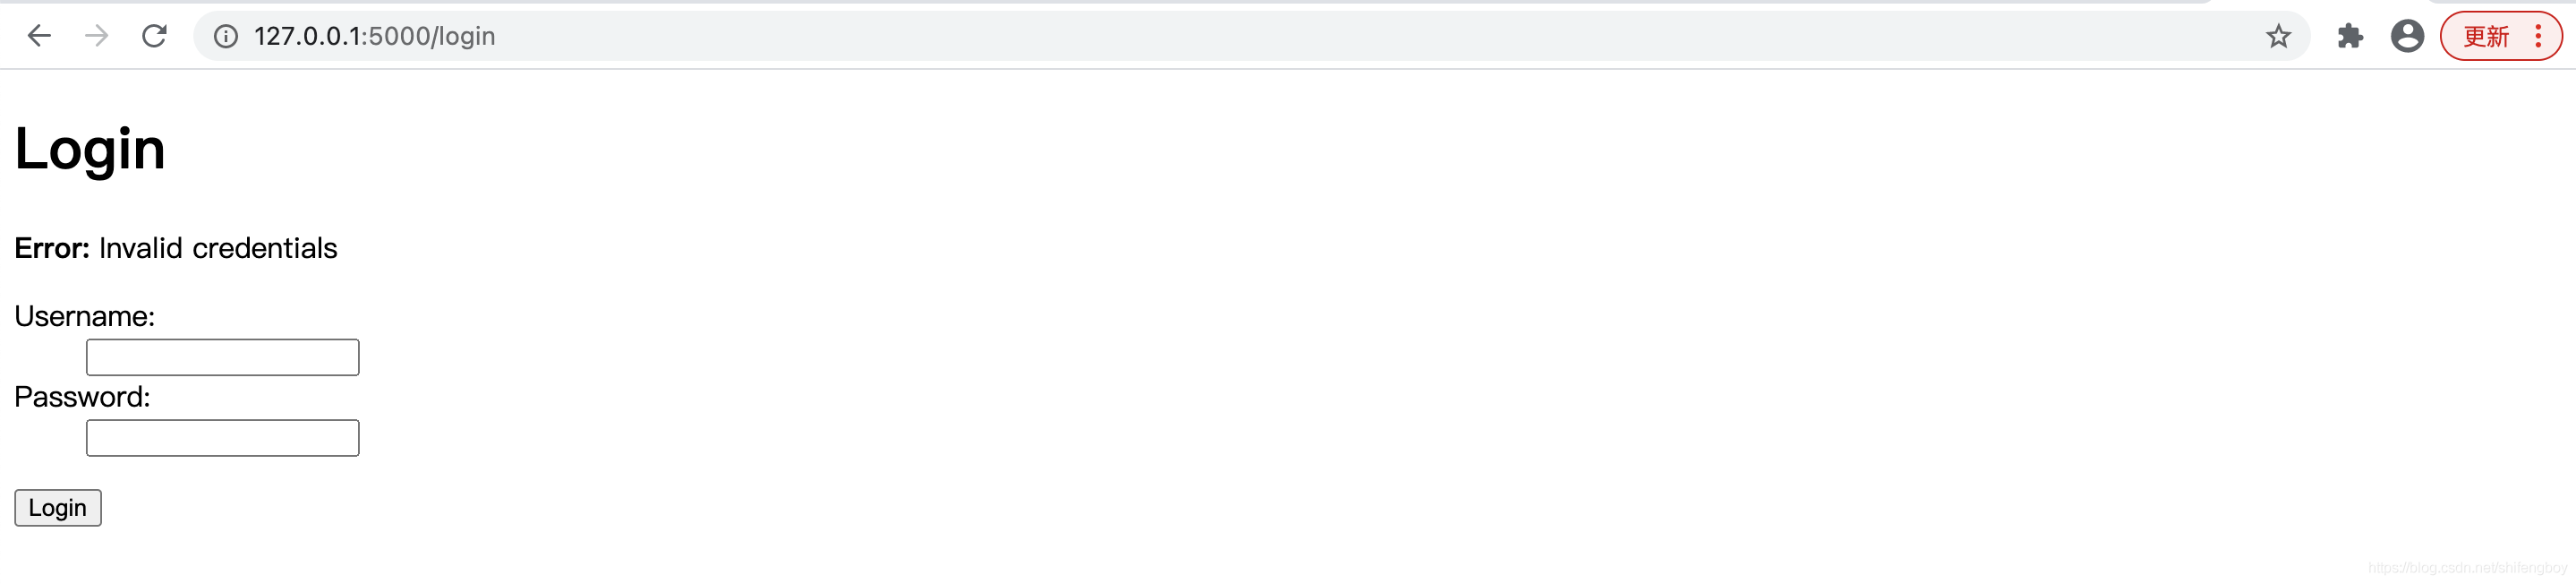
登录成功页

在 Flask 中处理文件上传非常简单。它需要一个 HTML 表单,其 enctype 属性设置为'multipart/form-data',将文件发布到 URL。URL 处理程序从 request.files[] 对象中提取文件,并将其保存到所需的位置。
每个上传的文件首先会保存在服务器上的临时位置,然后将其实际保存到它的最终位置。目标文件的名称可以是硬编码的,也可以从 request.files[file] 对象的filename属性中获取。但是,建议使用 secure_filename() 函数获取它的安全版本。
可以在 Flask 对象的配置设置中定义默认上传文件夹的路径和上传文件的最大大小。
app.config[‘UPLOAD_FOLDER'] 定义上传文件夹的路径 app.config[‘MAX_CONTENT_LENGTH'] 指定要上传的文件的最大大小(以字节为单位)
以下代码具有 '/upload' URL 规则,该规则在 templates 文件夹中显示 'upload.html',以及 '/ upload-file' URL 规则,用于调用 uploader() 函数处理上传过程。
'upload.html' 有一个文件选择器按钮和一个提交按钮。
html>
head>
 title>File Upload/title>
/head>
body>
 form action="http://localhost:5000/uploader" method="POST" enctype="multipart/form-data">
  input type="file" name="file" accept=".jpg,.png" />
  input type="submit" />
 /form>
/body>
/html>
以下是 Flask 应用程序的 Python 代码。
from flask import Flask, render_template, request
from werkzeug.utils import secure_filename
import os

app = Flask(__name__)
app.config['UPLOAD_FOLDER'] = '/Users/chenshifeng/upload/'

@app.route('/upload')
def upload_file():
 return render_template('upload.html')

@app.route('/uploader', methods = ['GET', 'POST'])
def uploader():
 if request.method == 'POST':
  f = request.files['file']
  f.save(os.path.join(app.config['UPLOAD_FOLDER'],secure_filename(f.filename)))
  return 'file uploaded successfully'

if __name__ == '__main__':
 app.run()
您将看到如下所示的界面。

选择文件后,单击提交。表单的 post 方法调用 '/ upload_file' URL。底层函数 uploader() 执行保存操作。
上传成功会显示以下画面:

上传文件被放到/Users/chenshifeng/upload文件夹下:

Flask通常被称为微框架,因为核心功能包括基于Werkzeug的WSGI和路由以及基于Jinja2的模板引擎。此外,Flask框架还支持cookie和会话,以及JSON,静态文件等Web帮助程序。显然,这不足以开发完整的Web应用程序。而Flask扩展就具备这样的功能。Flask扩展为Flask框架提供了可扩展性。
有大量的Flask扩展可用。Flask扩展是一个Python模块,它向Flask应用程序添加了特定类型的支持。Flask Extension Registry(Flask扩展注册表)是一个可用的扩展目录。可以通过pip实用程序下载所需的扩展名。
在本教程中,我们将讨论以下重要的Flask扩展:
每种类型的扩展通常提供有关其用法的大量文档。由于扩展是一个Python模块,因此需要导入它才能使用它。Flask扩展名通常命名为flask-foo。导入的操作如下:
from flask_foo import [class, function]
对于0.7以后的Flask版本,您还可以使用语法:
from flask.ext import foo
对于此用法,需要激活兼容性模块。它可以通过运行flaskext_compat.py来安装:
import flaskext_compat
flaskext_compat.activate()
from flask.ext import foo
务器建立简单的接口变得非常容易。
首先,应该在pip实用程序的帮助下安装Flask-Mail扩展。
pip install Flask-Mail
然后需要通过设置以下应用程序参数的值来配置Flask-Mail。
| 参数 | 描述 |
|---|---|
| MAIL_SERVER | 电子邮件服务器的名称/IP地址 |
| MAIL_PORT | 使用的服务器的端口号 |
| MAIL_USE_TLS | 启用/禁用传输安全层加密 |
| MAIL_USE_SSL | 启用/禁用安全套接字层加密 |
| MAIL_DEBUG | 调试支持。默认值是Flask应用程序的调试状态 |
| MAIL_USERNAME | 发件人的用户名 |
| MAIL_PASSWORD | 发件人的密码 |
| MAIL_DEFAULT_SENDER | 设置默认发件人 |
| MAIL_MAX_EMAILS | 设置要发送的最大邮件数 |
| MAIL_SUPPRESS_SEND | 如果app.testing设置为true,则发送被抑制 |
| MAIL_ASCII_ATTACHMENTS | 如果设置为true,则附加的文件名将转换为ASCII |
flask-mail模块包含以下重要类的定义。
14.1.1 Mail类
它管理电子邮件消息传递需求。类构造函数采用以下形式:
flask-mail.Mail(app = None)
构造函数将Flask应用程序对象作为参数。
Mail类的方法:
| 方法 | 描述 |
|---|---|
| send() | 发送Message类对象的内容 |
| connect() | 打开与邮件主机的连接 |
| send_message() | 发送消息对象 |
14.1.2 Message类
它封装了一封电子邮件。Message类构造函数有几个参数:
flask-mail.Message(subject, recipients, body, html, sender, cc, bcc, reply-to, date, charset, extra_headers, mail_options,rcpt_options)
Message类方法:
attach() - 为邮件添加附件。此方法采用以下参数:
filename - 要附加的文件的名称content_type - MIME类型的文件data - 原始文件数据处置 - 内容处置(如果有的话)。
add_recipient() - 向邮件添加另一个收件人
在下面的示例中,使用QQ邮箱服务的SMTP服务器用作Flask-Mail配置的MAIL_SERVER。
from flask import Flask
from flask_mail import Mail, Message

app =Flask(__name__)
mail=Mail(app)

app.config['MAIL_SERVER']='smtp.qq.com'
app.config['MAIL_PORT'] = 465
app.config['MAIL_USERNAME'] = 'xxxxx@qq.com'
app.config['MAIL_PASSWORD'] = 'xxxxxxxx'
app.config['MAIL_USE_TLS'] = False
app.config['MAIL_USE_SSL'] = True
mail = Mail(app)

@app.route("/")
def index():
 msg = Message('Hello', sender = 'xxxxx@qq.com', recipients = ['xxxxx@qq.com'])
 msg.body = "Hello Flask message sent from Flask-Mail"
 mail.send(msg)
 return "Sent"

if __name__ == '__main__':
 app.run(debug = True)

步骤1 - 安装Flask-SQLAlchemy扩展。
pip install flask-sqlalchemy
步骤2 - 您需要从此模块导入SQLAlchemy类。
from flask_sqlalchemy import SQLAlchemy
步骤3 - 现在创建一个Flask应用程序对象并为要使用的数据库设置URI。
app = Flask(__name__)
app.config['SQLALCHEMY_DATABASE_URI'] = 'sqlite:///students.sqlite3'
步骤4 - 然后使用应用程序对象作为参数创建SQLAlchemy类的对象。该对象包含用于ORM操作的辅助函数。它还提供了一个父Model类,使用它来声明用户定义的模型。在下面的代码段中,创建了students模型。
db = SQLAlchemy(app)
class students(db.Model):
 id = db.Column('student_id', db.Integer, primary_key = True)
 name = db.Column(db.String(100))
 city = db.Column(db.String(50))
 addr = db.Column(db.String(200))
 pin = db.Column(db.String(10))

def __init__(self, name, city, addr,pin):
 self.name = name
 self.city = city
 self.addr = addr
 self.pin = pin
步骤5 - 要创建/使用URI中提及的数据库,请运行create_all()方法。
db.create_all()
SQLAlchemy的Session对象管理ORM对象的所有持久性操作。
以下session方法执行CRUD操作:
您可以通过使用filter属性将过滤器应用于检索到的记录集。例如,要在学生表中检索city ='Hyderabad'的记录,请使用以下语句:
Students.query.filter_by(city = 'Hyderabad').all()
有了这么多的背景,现在我们将为我们的应用程序提供视图函数来添加学生数据。
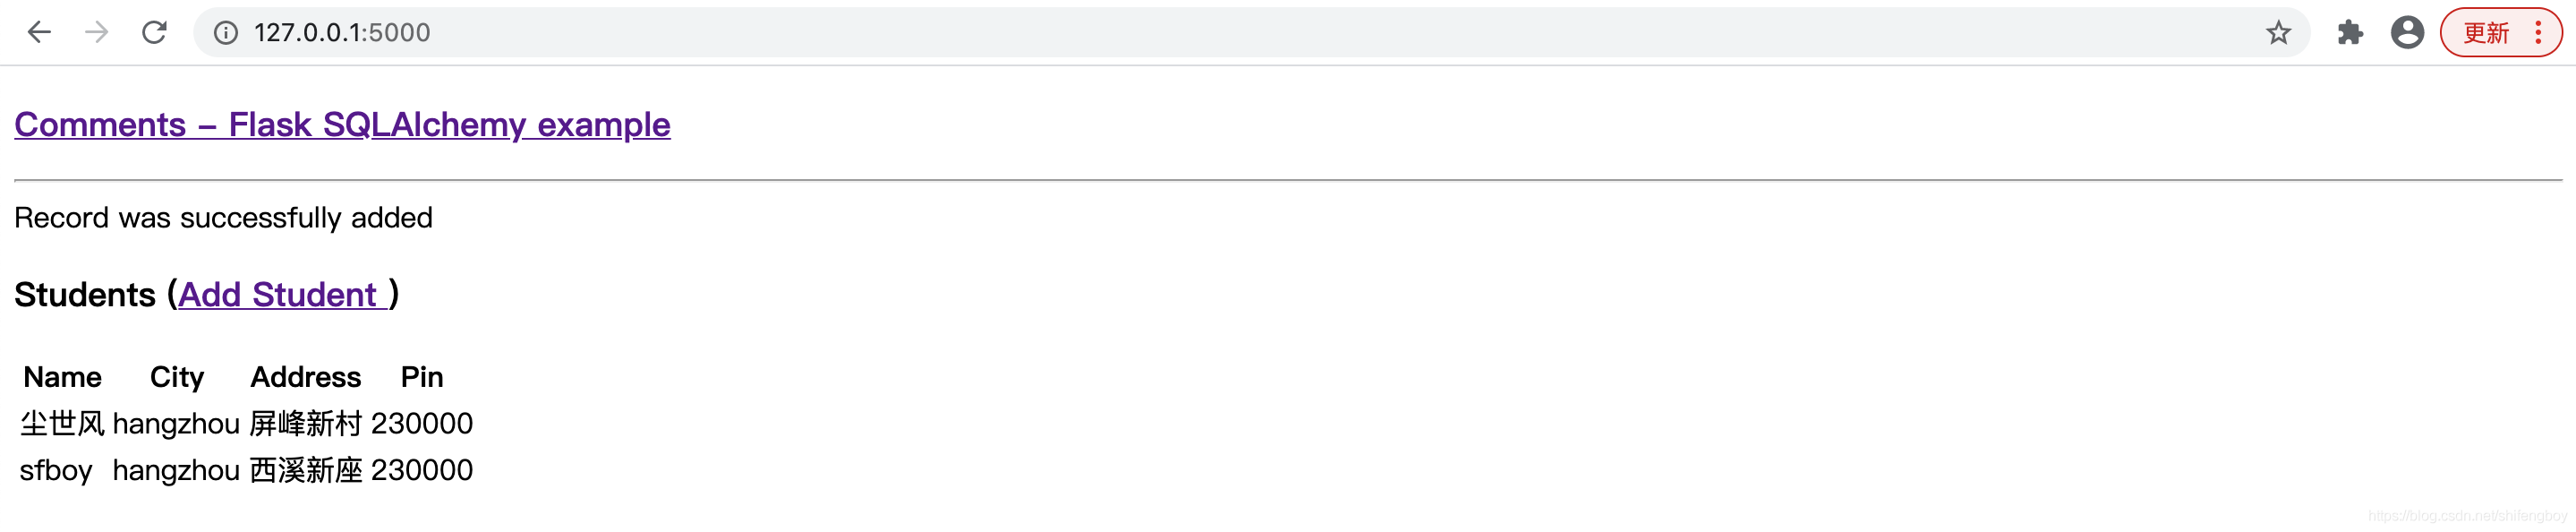
应用程序的入口点是绑定到'/' URL的show_all()函数。学生表的记录集作为参数发送到HTML模板。模板中的服务器端代码以HTML表格形式呈现记录。
@app.route('/')
def show_all():
 return render_template('show_all.html', students = students.query.all() )
模板('show_all.html')的HTML脚本如下:
!DOCTYPE html>
html lang = "en">
 head>/head>
 body>

  h3>
   a href = "{{ url_for('show_all') }}">Comments - Flask
   SQLAlchemy example/a>
  /h3>

  hr/>
  {%- for message in get_flashed_messages() %}
   {{ message }}
  {%- endfor %}

  h3>Students (a href = "{{ url_for('new') }}">Add Student
   /a>)/h3>

  table>
   thead>
   tr>
    th>Name/th>
    th>City/th>
    th>Address/th>
    th>Pin/th>
   /tr>
   /thead>

   tbody>
   {% for student in students %}
    tr>
     td>{{ student.name }}/td>
     td>{{ student.city }}/td>
     td>{{ student.addr }}/td>
     td>{{ student.pin }}/td>
    /tr>
   {% endfor %}
   /tbody>
  /table>

 /body>
/html>
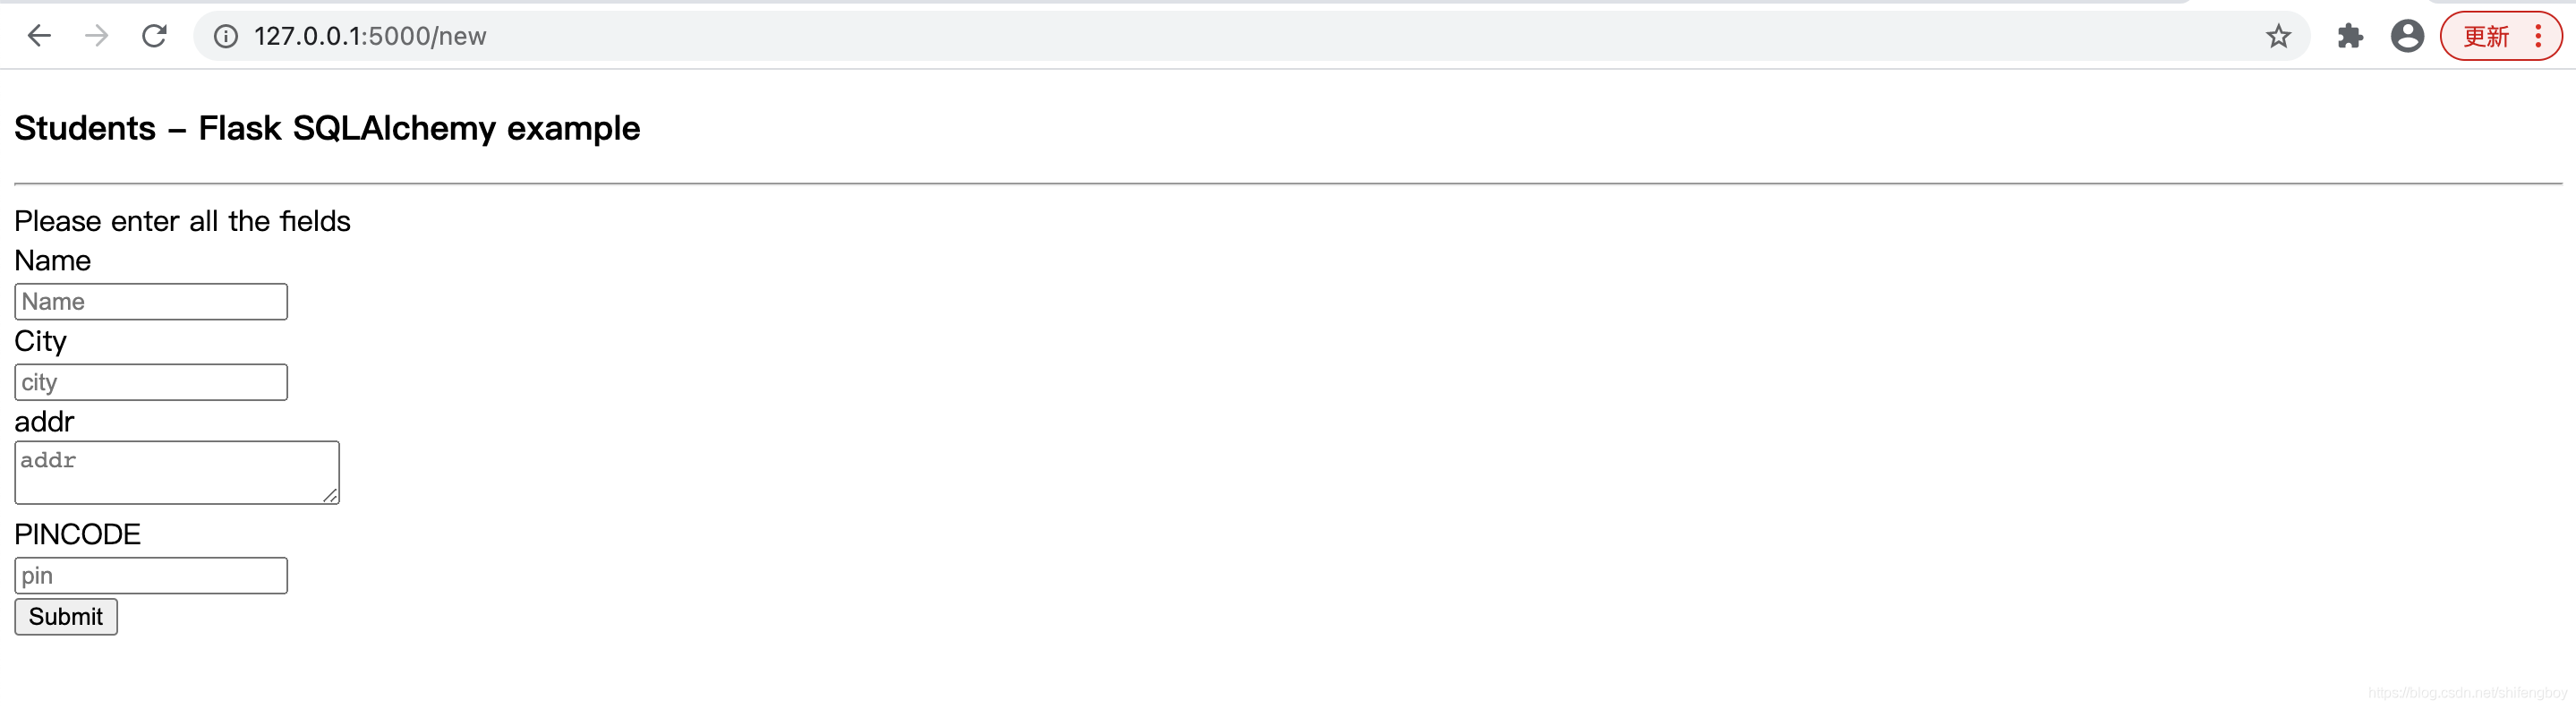
上述网页包含指向'/ new' URL映射new()函数的超链接。单击时,将打开“学生信息”表单。 数据在 POST方法中发布到相同的URL。
new.html
!DOCTYPE html>
html>
 body>

  h3>Students - Flask SQLAlchemy example/h3>
  hr/>

  {%- for category, message in get_flashed_messages(with_categories = true) %}
   div class = "alert alert-danger">
   {{ message }}
   /div>
  {%- endfor %}

  form action = "{{ request.path }}" method = "post">
   label for = "name">Name/label>br>
   input type = "text" name = "name" placeholder = "Name" />br>
   label for = "email">City/label>br>
   input type = "text" name = "city" placeholder = "city" />br>
   label for = "addr">addr/label>br>
   textarea name = "addr" placeholder = "addr">/textarea>br>
   label for = "PIN">PINCODE/label>br>
   input type = "text" name = "pin" placeholder = "pin" />br>
   input type = "submit" value = "Submit" />
  /form>

 /body>
/html>
当http方法被检测为POST时,表单数据被添加到学生表中,并且应用返回到显示添加数据的主页。
@app.route('/new', methods = ['GET', 'POST'])
def new():
 if request.method == 'POST':
  if not request.form['name'] or not request.form['city'] or not request.form['addr']:
   flash('Please enter all the fields', 'error')
  else:
   student = students(request.form['name'], request.form['city'],
   request.form['addr'], request.form['pin'])

   db.session.add(student)
   db.session.commit()

   flash('Record was successfully added')
   return redirect(url_for('show_all'))
 return render_template('new.html')
下面给出了应用程序(app.py)的完整代码。
from flask import Flask, request, flash, url_for, redirect, render_template
from flask_sqlalchemy import SQLAlchemy

app = Flask(__name__)
app.config['SQLALCHEMY_DATABASE_URI'] = 'sqlite:///students.sqlite3'
app.config['SECRET_KEY'] = "random string"

db = SQLAlchemy(app)


class students(db.Model):
 id = db.Column('student_id', db.Integer, primary_key=True)
 name = db.Column(db.String(100))
 city = db.Column(db.String(50))
 addr = db.Column(db.String(200))
 pin = db.Column(db.String(10))


 def __init__(self, name, city, addr, pin):
  self.name = name
  self.city = city
  self.addr = addr
  self.pin = pin


@app.route('/')
def show_all():
 return render_template('show_all.html', students=students.query.all())


@app.route('/new', methods=['GET', 'POST'])
def new():
 if request.method == 'POST':
  if not request.form['name'] or not request.form['city'] or not request.form['addr']:
   flash('Please enter all the fields', 'error')
  else:
   student = students(request.form['name'], request.form['city'],
        request.form['addr'], request.form['pin'])

   db.session.add(student)
   db.session.commit()
   flash('Record was successfully added')
   return redirect(url_for('show_all'))
 return render_template('new.html')


if __name__ == '__main__':
 db.create_all()
 app.run(debug=True)
首页

错误页:
提交成功页:
本文参考:https://www.w3cschool.cn/flask/
到此这篇关于python flask框架详解的文章就介绍到这了,更多相关python flask框架内容请搜索脚本之家以前的文章或继续浏览下面的相关文章希望大家以后多多支持脚本之家!
标签:西宁 石家庄 梅州 文山 怀化 浙江 昆明 锡林郭勒盟
巨人网络通讯声明:本文标题《python flask框架详解》,本文关键词 python,flask,框架,详解,python,;如发现本文内容存在版权问题,烦请提供相关信息告之我们,我们将及时沟通与处理。本站内容系统采集于网络,涉及言论、版权与本站无关。