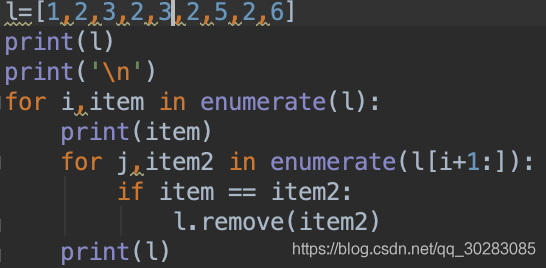
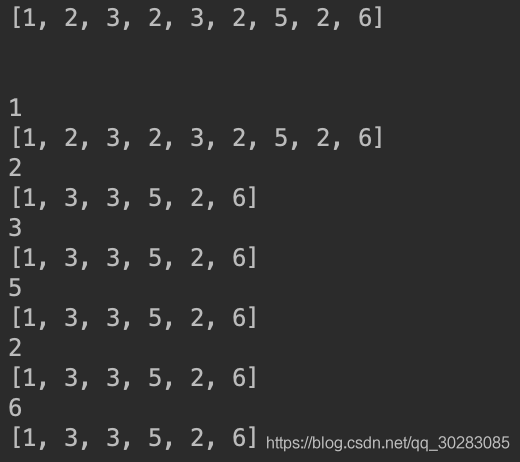
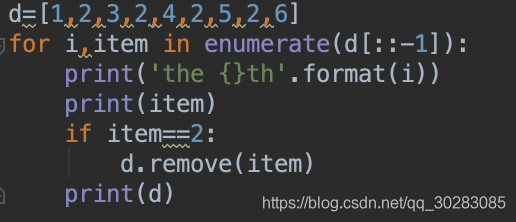
python list删除元素有remove()和pop(),remove()对元素进行操作,pop()对索引进行操作,并会返回pop掉的值。一个只会从列表移除一个数
**查阅一些资料后发现:list的遍历是基于下标的不是基于元素,你删掉一个元素后,列表就发生了变化,所有的元素都往前移动了一个位置,假设要删除重的2,一个列表中索引为4,对应的值为2,索引为5,对应的值为2,索引为6,对应的值为3,当前循环删掉索引4时对应的值2之后,索引4的值为2,索引5,值为3,下一次循环,本来要再删一个2,但此时索引为5对应的为3,就漏掉了一个2。
import cv2
import numpy as np
from PIL import Image
import requests
from io import BytesIO
import matplotlib

matplotlib.use('TkAgg')
import matplotlib.pyplot as plt


def aHash(img):
    # 均值哈希算法
    # 缩放为8*8
    img = cv2.resize(img, (8, 8))
    # 转换为灰度图
    gray = cv2.cvtColor(img, cv2.COLOR_BGR2GRAY)
    # s为像素和初值为0,hash_str为hash值初值为''
    s = 0
    hash_str = ''
    # 遍历累加求像素和
    for i in range(8):
        for j in range(8):
            s = s + gray[i, j]
    # 求平均灰度
    avg = s / 64
    # 灰度大于平均值为1相反为0生成图片的hash值
    for i in range(8):
        for j in range(8):
            if gray[i, j] > avg:
                hash_str = hash_str + '1'
            else:
                hash_str = hash_str + '0'
    return hash_str


def dHash(img):
    # 差值哈希算法
    # 缩放8*8
    img = cv2.resize(img, (9, 8))
    # 转换灰度图
    gray = cv2.cvtColor(img, cv2.COLOR_BGR2GRAY)
    hash_str = ''
    # 每行前一个像素大于后一个像素为1,相反为0,生成哈希
    for i in range(8):
        for j in range(8):
            if gray[i, j] > gray[i, j + 1]:
                hash_str = hash_str + '1'
            else:
                hash_str = hash_str + '0'
    return hash_str


def pHash(img):
    # 感知哈希算法
    # 缩放32*32
    img = cv2.resize(img, (32, 32))  # , interpolation=cv2.INTER_CUBIC
    # 转换为灰度图
    gray = cv2.cvtColor(img, cv2.COLOR_BGR2GRAY)
    # 将灰度图转为浮点型,再进行dct变换
    dct = cv2.dct(np.float32(gray))
    # opencv实现的掩码操作
    dct_roi = dct[0:8, 0:8]

    hash = []
    avreage = np.mean(dct_roi)
    for i in range(dct_roi.shape[0]):
        for j in range(dct_roi.shape[1]):
            if dct_roi[i, j] > avreage:
                hash.append(1)
            else:
                hash.append(0)
    return hash


def calculate(image1, image2):
    # 灰度直方图算法
    # 计算单通道的直方图的相似值
    hist1 = cv2.calcHist([image1], [0], None, [256], [0.0, 255.0])
    hist2 = cv2.calcHist([image2], [0], None, [256], [0.0, 255.0])
    # 计算直方图的重合度
    degree = 0
    for i in range(len(hist1)):
        if hist1[i] != hist2[i]:
            degree = degree + \

                     (1 - abs(hist1[i] - hist2[i]) / max(hist1[i], hist2[i]))
        else:
            degree = degree + 1
    degree = degree / len(hist1)
    return degree


def classify_hist_with_split(image1, image2, size=(256, 256)):
    # RGB每个通道的直方图相似度
    # 将图像resize后,分离为RGB三个通道,再计算每个通道的相似值
    image1 = cv2.resize(image1, size)
    image2 = cv2.resize(image2, size)
    sub_image1 = cv2.split(image1)
    sub_image2 = cv2.split(image2)
    sub_data = 0
    for im1, im2 in zip(sub_image1, sub_image2):
        sub_data += calculate(im1, im2)
    sub_data = sub_data / 3
    return sub_data


def cmpHash(hash1, hash2):
    # Hash值对比
    # 算法中1和0顺序组合起来的即是图片的指纹hash。顺序不固定,但是比较的时候必须是相同的顺序。
    # 对比两幅图的指纹,计算汉明距离,即两个64位的hash值有多少是不一样的,不同的位数越小,图片越相似
    # 汉明距离:一组二进制数据变成另一组数据所需要的步骤,可以衡量两图的差异,汉明距离越小,则相似度越高。汉明距离为0,即两张图片完全一样
    n = 0
    # hash长度不同则返回-1代表传参出错
    if len(hash1) != len(hash2):
        return -1
    # 遍历判断
    for i in range(len(hash1)):
        # 不相等则n计数+1,n最终为相似度
        if hash1[i] != hash2[i]:
            n = n + 1
    return n


def getImageByUrl(url):
    # 根据图片url 获取图片对象
    html = requests.get(url, verify=False)
    image = Image.open(BytesIO(html.content))
    return image


def PILImageToCV():
    # PIL Image转换成OpenCV格式
    path = "/Users/waldenz/Documents/Work/doc/TestImages/t3.png"
    img = Image.open(path)
    plt.subplot(121)
    plt.imshow(img)
    print(isinstance(img, np.ndarray))
    img = cv2.cvtColor(np.asarray(img), cv2.COLOR_RGB2BGR)
    print(isinstance(img, np.ndarray))
    plt.subplot(122)
    plt.imshow(img)
    plt.show()


def CVImageToPIL():
    # OpenCV图片转换为PIL image
    path = "/Users/waldenz/Documents/Work/doc/TestImages/t3.png"
    img = cv2.imread(path)
    # cv2.imshow("OpenCV",img)
    plt.subplot(121)
    plt.imshow(img)

    img2 = Image.fromarray(cv2.cvtColor(img, cv2.COLOR_BGR2RGB))
    plt.subplot(122)
    plt.imshow(img2)
    plt.show()


def bytes_to_cvimage(filebytes):
    # 图片字节流转换为cv image
    image = Image.open(filebytes)
    img = cv2.cvtColor(np.asarray(image), cv2.COLOR_RGB2BGR)
    return img


def runAllImageSimilaryFun(para1, para2):
    # 均值、差值、感知哈希算法三种算法值越小,则越相似,相同图片值为0
    # 三直方图算法和单通道的直方图 0-1之间,值越大,越相似。 相同图片为1
    # t1,t2   14;19;10;  0.70;0.75
    # t1,t3   39 33 18   0.58 0.49
    # s1,s2  7 23 11     0.83 0.86  挺相似的图片
    # c1,c2  11 29 17    0.30 0.31

    if para1.startswith("http"):
        # 根据链接下载图片,并转换为opencv格式
        img1 = getImageByUrl(para1)
        img1 = cv2.cvtColor(np.asarray(img1), cv2.COLOR_RGB2BGR)

        img2 = getImageByUrl(para2)
        img2 = cv2.cvtColor(np.asarray(img2), cv2.COLOR_RGB2BGR)
    else:
        # 通过imread方法直接读取物理路径
        img1 = cv2.imread(para1)
        img2 = cv2.imread(para2)

    hash1 = aHash(img1)
    hash2 = aHash(img2)
    n1 = cmpHash(hash1, hash2)
    print('均值哈希算法相似度aHash:', n1)

    hash1 = dHash(img1)
    hash2 = dHash(img2)
    n2 = cmpHash(hash1, hash2)
    print('差值哈希算法相似度dHash:', n2)

    hash1 = pHash(img1)
    hash2 = pHash(img2)
    n3 = cmpHash(hash1, hash2)
    print('感知哈希算法相似度pHash:', n3)

    n4 = classify_hist_with_split(img1, img2)
    print('三直方图算法相似度:', n4)

    n5 = calculate(img1, img2)
    print("单通道的直方图", n5)
    print("%d %d %d %.2f %.2f " % (n1, n2, n3, round(n4[0], 2), n5[0]))
    print("%.2f %.2f %.2f %.2f %.2f " % (1 - float(n1 / 64), 1 -
                                         float(n2 / 64), 1 - float(n3 / 64), round(n4[0], 2), n5[0]))

    plt.subplot(121)
    plt.imshow(Image.fromarray(cv2.cvtColor(img1, cv2.COLOR_BGR2RGB)))
    plt.subplot(122)
    plt.imshow(Image.fromarray(cv2.cvtColor(img2, cv2.COLOR_BGR2RGB)))
    plt.show()


def runtwoImageSimilaryFun(para1, para2):
    # 均值、差值、感知哈希算法三种算法值越小,则越相似,相同图片值为0
    # 三直方图算法和单通道的直方图 0-1之间,值越大,越相似。 相同图片为1
    # t1,t2   14;19;10;  0.70;0.75
    # t1,t3   39 33 18   0.58 0.49
    # s1,s2  7 23 11     0.83 0.86  挺相似的图片
    # c1,c2  11 29 17    0.30 0.31

    if para1.startswith("http"):
        # 根据链接下载图片,并转换为opencv格式
        img1 = getImageByUrl(para1)
        img1 = cv2.cvtColor(np.asarray(img1), cv2.COLOR_RGB2BGR)

        img2 = getImageByUrl(para2)
        img2 = cv2.cvtColor(np.asarray(img2), cv2.COLOR_RGB2BGR)
    else:
        # 通过imread方法直接读取物理路径
        img1 = cv2.imread(para1)
        img2 = cv2.imread(para2)


    hash1 = pHash(img1)
    hash2 = pHash(img2)
    n3 = cmpHash(hash1, hash2)

    n4 = classify_hist_with_split(img1, img2)

    return n3, n4


if __name__ == "__main__":
    p1 = '/Users/Desktop/11/24.jpeg'
    p2 = '/Users/Desktop/11/25.jpeg'
    runAllImageSimilaryFun(p1, p2)
到此这篇关于Python列表删除重复元素与图像相似度判断及删除的文章就介绍到这了,更多相关Python列表删除重复元素内容请搜索脚本之家以前的文章或继续浏览下面的相关文章希望大家以后多多支持脚本之家!