一.服务器安装docker
修改配置文件,打开2375端口
[root@microservice ~]# vim /usr/lib/systemd/system/docker.service
在ExecStart=/usr/bin/dockerd-current 后面加上-H tcp://0.0.0.0:2375 -H unix://var/run/docker.sock \
重新加载配置文件和启动:
systemctl daemon-reload
systemctl start docker
附:docker操作相关命令
systemctl命令是系统服务管理器指令,它是 service 和 chkconfig 两个命令组合。
启动docker:systemctl start docker
停止docker:systemctl stop docker
重启docker:systemctl restart docker
查看docker状态:systemctl status docker
开机启动:systemctl enable docker
二、Idea安装docker支持插件及配置
1.idea下载docker支持插件:Docker integration
(快捷键Crtl+shift+A 搜索Docker integration ,然后启用,重启idea生效)
2.IDEA Docker插件配置
File–>Settings–>Build,Execution,Deployment–>Docker–>进行如下配置:
tcp://服务器ip地址:2375

注意: 只要下面提示Connection successfl 就表示连接成功了;
3.配置pom文件:
<build>
  <finalName>${project.artifactId}</finalName>
  <plugins>
    <plugin>
      <groupId>org.springframework.boot</groupId>
      <artifactId>spring-boot-maven-plugin</artifactId>
      <configuration>
        <fork>true</fork>
      </configuration>
    </plugin>
    <!-- 跳过单元测试 -->
    <plugin>
      <groupId>org.apache.maven.plugins</groupId>
      <artifactId>maven-surefire-plugin</artifactId>
      <configuration>
        <skipTests>true</skipTests>
      </configuration>
    </plugin>
    <!--使用docker-maven-plugin插件-->
    <plugin>
      <groupId>com.spotify</groupId>
      <artifactId>docker-maven-plugin</artifactId>
      <version>1.0.0</version>
      <!--将插件绑定在某个phase执行-->
      <executions>
        <execution>
          <id>build-image</id>
          <!--用户只需执行mvn package ,就会自动执行mvn docker:build-->
          <phase>package</phase>
          <goals>
            <goal>build</goal>
          </goals>
        </execution>
      </executions>
      <configuration>
        <!--指定生成的镜像名-->
        <imageName>fred/${project.artifactId}</imageName>
        <!--指定标签-->
        <imageTags>
          <imageTag>latest</imageTag>
        </imageTags>
        <!-- 指定 Dockerfile 路径-->
        <dockerDirectory>src/main/docker</dockerDirectory>
        <!--指定远程 docker api地址-->
        <dockerHost>http://服务器ip地址:2375</dockerHost>
        <!-- 这里是复制 jar 包到 docker 容器指定目录配置 -->
        <resources>
          <resource>
            <targetPath>/</targetPath>
            <!--jar 包所在的路径 此处配置的 即对应 target 目录-->
            <directory>${project.build.directory}</directory>
            <!-- 需要包含的 jar包 ,这里对应的是 Dockerfile中添加的文件名 -->
            <include>${project.build.finalName}.jar</include>
          </resource>
        </resources>
      </configuration>
    </plugin>
  </plugins>
</build>
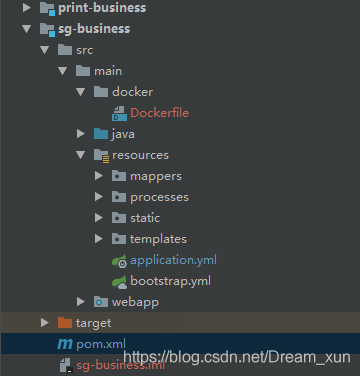
附项目目录结构:
四、根目录下编写Dockerfile
# Dockerfile
# 基于的镜像
FROM openjdk:8-jdk-alpine

VOLUME /opt/tmp

ADD sg-business.jar app.jar

# -Djava.security.egd=file:/dev/./urandom 可解决tomcat可能启动慢的问题
# 具体可查看:https://www.cnblogs.com/mightyvincent/p/7685310.html
ENTRYPOINT ["java","-Djava.security.egd=file:/dev/./urandom","-jar","/app.jar"]

# 对外端口
EXPOSE 8081
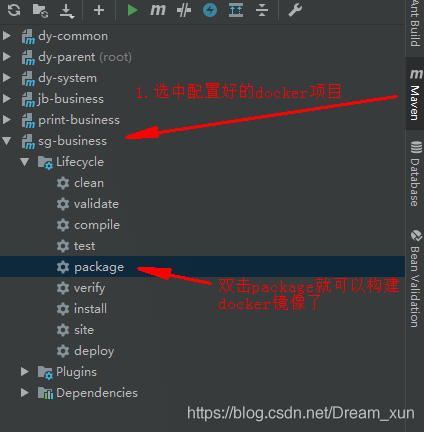
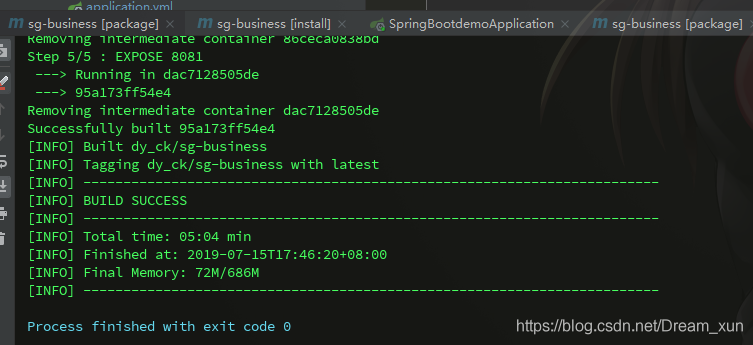
五、点击maven的package进行构建
构建成功的信息
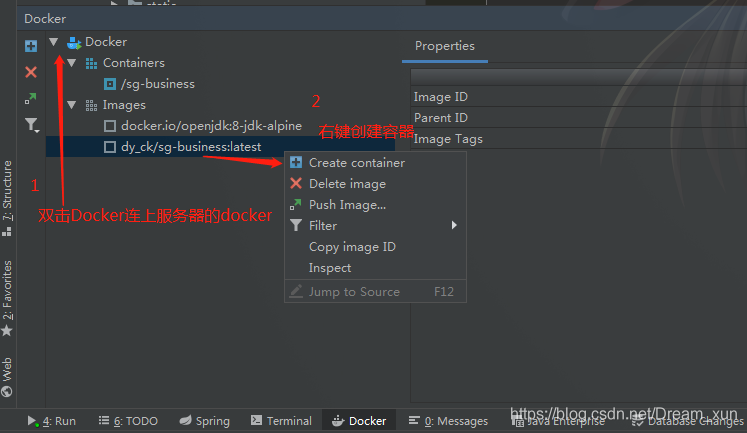
六、点击最下面的docker到docker界面,双击docker连上服务器docker会显示出服务器上的docker镜像,找到刚刚生成的镜像(图中2),点击创建容器
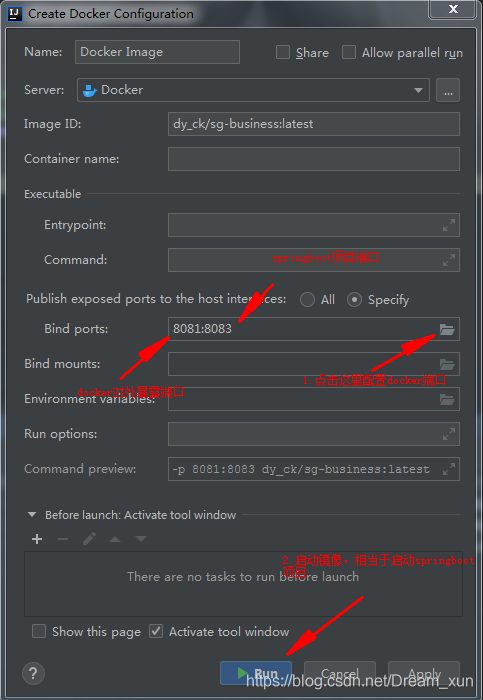
七.配置docker 容器对外暴露端口和项目接口端口,然后run启动容器
最后,设置好后,启动容器,启动成功后去阿里云查看是否启动成功
参考博客地址:
https://www.jianshu.com/p/186e9926600e
https://blog.lqdev.cn/2018/07/27/springboot/chapter-fourteen/
https://www.cnblogs.com/fangts/p/10299431.html
到此这篇关于idea集合docker实现镜像打包一键部署的文章就介绍到这了,更多相关idea集合docker实现镜像打包一键部署内容请搜索脚本之家以前的文章或继续浏览下面的相关文章希望大家以后多多支持脚本之家!